Spring Boot 与自动装配
🧩 1. Spring Boot 自动装配的原理是什么?@SpringBootApplication 做了什么?
自动装配的本质是“根据类路径中的依赖和配置,自动推断并创建 Bean,而无需你手动编写繁琐的配置类。” 它像一位经验丰富的管家,看到你书架上有书(依赖),就会把对应的书桌、台灯(Bean)都准备好。
@SpringBootApplication 是这三者的合体:
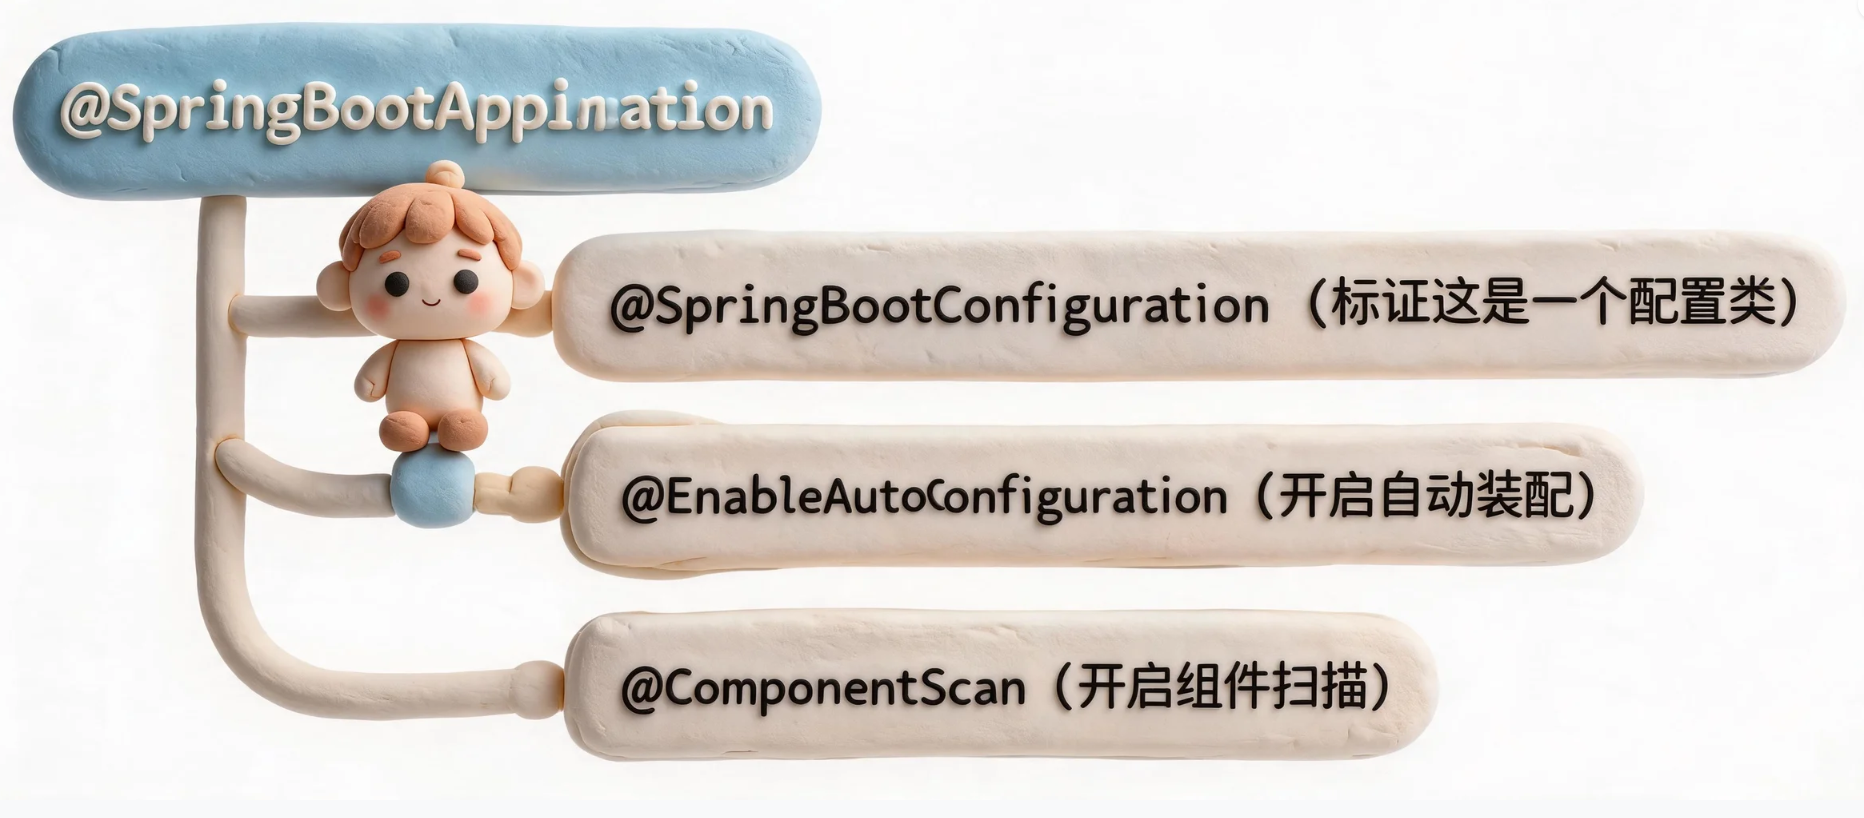
真正的魔术师是 @EnableAutoConfiguration。它通过 @Import(AutoConfigurationImportSelector.class) 导入了一个选择器,这个选择器会去读取所有依赖的 META-INF/spring/org.springframework.boot.autoconfigure.AutoConfiguration.imports 文件(Spring Boot 2.7+,更早版本是 spring.factories)。
加载流程:
1. 启动类 → @EnableAutoConfiguration
2. AutoConfigurationImportSelector 扫描所有 AutoConfiguration.imports 文件
3. 收集到上百个候选配置类(如 DataSourceAutoConfiguration)
4. 逐个评估 @ConditionalOnClass / @ConditionalOnMissingBean 等条件注解
5. 条件满足 → 加载该配置类 → 创建对应的 Bean 并放入容器
为什么加上 @Conditional 注解?
如果没有这些条件注解,所有候选配置类都会无条件加载,那你的应用就会因为缺少某些类而崩溃。例如,DataSourceAutoConfiguration 只有在类路径中存在 DataSource 类、且容器中没有你手动定义的 DataSource Bean 时才生效。这种 “按需激活” 是自动装配的精髓。
示例代码:验证自动装配
你可以在 application.yml 中通过 debug: true 查看哪些自动配置类被激活了:
然后在启动日志中搜索 AutoConfiguration,或者用 spring-boot-actuator 的 /actuator/conditions 端点查看正匹配和负匹配的条件。
用一张图概括 @SpringBootApplication 的结构:

🛠️ 2. 如何自定义一个 Spring Boot Starter?
自定义 Starter 就是把“一组可复用的自动配置 + 依赖”打包成一个独立的模块。它通常包含两个子模块:autoconfigure(自动配置逻辑)和 starter(空壳,只引入 autoconfigure 和所需依赖)。
以创建一个 agent-tool-starter 为例,它会在启动时自动创建一个 ToolService Bean,并根据配置项 agent.tool.name 来设置工具名称。
步骤一:创建 autoconfigure 模块
// 1. 属性类,绑定 application.yml 中的前缀
@ConfigurationProperties(prefix = "agent.tool")
public class ToolProperties {
    private String name = "default-tool";
    // getter/setter...
}

// 2. 核心服务
public class ToolService {
    private final String toolName;
    public ToolService(String toolName) { this.toolName = toolName; }
    public String call() { return "Calling " + toolName; }
}

// 3. 自动配置类,负责创建 Bean
@Configuration
@EnableConfigurationProperties(ToolProperties.class)
@ConditionalOnClass(ToolService.class)
public class ToolAutoConfiguration {

    @Bean
    @ConditionalOnMissingBean
    public ToolService toolService(ToolProperties properties) {
        return new ToolService(properties.getName());
    }
}
步骤二:在 resources/META-INF/spring/org.springframework.boot.autoconfigure.AutoConfiguration.imports 中注册自动配置类:
步骤三:创建 starter 模块
它是一个空的 Maven 模块,只包含一个 pom.xml,依赖 autoconfigure 模块和 spring-boot-starter。用户只需在自己的项目中引入这个 starter,就会自动获得 ToolService Bean。
用户使用时的效果:
@SpringBootApplication
public class Application {
    public static void main(String[] args) {
        var ctx = SpringApplication.run(Application.class, args);
        ToolService tool = ctx.getBean(ToolService.class);
        System.out.println(tool.call());
    }
}
在 application.yml 中定制:
打包方式与约定:
-
autoconfigure 模块:包含配置类、属性类、服务类;
pom.xml中将spring-boot-autoconfigure作为可选依赖。 -
starter 模块:
pom.xml中引入autoconfigure模块及spring-boot-starter。用户只需在pom.xml中添加 starter 依赖。
结构一览:
agent-tool-spring-boot-starter/
├── pom.xml
└── src/main/resources/META-INF/spring/
    └── org.springframework.boot.autoconfigure.AutoConfiguration.imports

agent-tool-spring-boot-autoconfigure/
├── pom.xml
└── src/main/java/com/example/agent/tool/
    ├── ToolProperties.java
    ├── ToolService.java
    └── ToolAutoConfiguration.java
为什么分成两个模块?
为了遵循“关注点分离”。autoconfigure 包含所有配置类和逻辑,可以独立测试和版本管理;starter 只是一个引入入口,方便用户。这种模式也是 Spring 官方所有 Starter 的通用做法。
⚙️ 3. Spring Boot 的配置加载优先级?多环境配置如何管理?
Spring Boot 支持多达 17 个配置来源,它们按优先级从高到低排列。高优先级的配置会覆盖低优先级的相同键。这对于部署时灵活调整参数至关重要。
核心优先级顺序(从高到低):
-
命令行参数(
--server.port=9090) -
Java 系统属性(
System.getProperties()) -
操作系统环境变量(
export SERVER_PORT=9090) -
当前 profile 特定的
application-{profile}.yml(外部化,如config/目录下) -
当前 profile 特定的
application-{profile}.yml(内部 classpath) -
通用
application.yml(外部化) -
通用
application.yml(内部 classpath) -
@PropertySource注解引入的配置 -
默认属性(
SpringApplication.setDefaultProperties)
多环境管理 就是利用“profile 特定文件”来实现隔离。在 application.yml 中通过 spring.profiles.active 指定激活哪个环境,然后该环境对应的 application-{profile}.yml 会与主配置合并(相同键被 profile 文件覆盖)。
示例:
主配置 application.yml:
开发环境 application-dev.yml:
生产环境 application-prod.yml:
激活方式: 可以在主配置中设置 spring.profiles.active: dev,也可以通过环境变量或命令行参数覆盖:
更精细的配置管理:
-
spring.config.import可以导入外部配置,比如 Consul、Vault 或额外的配置文件。 -
spring.config.additional-location可指定额外的外部配置目录,优先级高于默认位置。 -
Kubernetes 部署:通常将非敏感配置放在 ConfigMap 中挂载为外部文件,敏感信息通过 Secrets 注入环境变量,再配合
spring.profiles.active实现不同部署环境(dev/staging/prod)的切换。
何时会用到外部化配置?
比如 Agent 服务的 LLM API Key,绝不能硬编码在 jar 里,而是通过环境变量 LLM_API_KEY 注入,由 Spring Boot 自动映射到 spring.ai.openai.api-key 或自定义属性。对于经常变的参数(如模型名称、超时时间),也建议外部化,避免重新打包。
优先级在 Agent 场景的应用:
假设你的 Agent 服务默认连接本地 LLM(application.yml 中设置 llm.url=``http://localhost:11434),但在 Docker 部署时想切换到远程服务,只需在 docker-compose.yml 中设置环境变量 LLM_URL=``http://gpu-server:8080,它就会覆盖默认值,而无需修改镜像。
收束:
自动装配让 Spring Boot 成为智能管家,Starter 让你把经验打包成可复用的乐高块,而配置优先级与环境分离则给了你在不同舞台上灵活演绎的剧本。这三者共同构成了 Spring Boot “约定大于配置”的哲学核心,也是它能在微服务和 AI 工程中遍地开花的根本原因。
Spring Boot 内嵌容器与启动流程
🔍 1. Spring Boot 的启动流程是什么?SpringApplication.run() 内部做了哪些事?
很多人以为 run() 只是“启动一个 Web 容器”,实际上它背后是一整套完备的启动生命周期,我们可以用一张“全景图”拆解成两个阶段:构造阶段 和 运行阶段。
1.1 构造阶段 —— new SpringApplication()
-
推断应用类型:根据 classpath 下是否存在
DispatcherServlet、Reactive相关类,决定是SERVLET、REACTIVE还是NONE。 -
加载
ApplicationContextInitializer:通过SpringFactoriesLoader从spring.factories中加载所有初始化器,用于在Context刷新前进行自定义配置。 -
加载
ApplicationListener:同样从spring.factories中加载事件监听器,后续各个启动阶段都会广播对应事件。
1.2 运行阶段 —— run(String... args) 的 10 个关键步骤
public ConfigurableApplicationContext run(String... args) {
    // 1. 启动计时器
    StopWatch stopWatch = new StopWatch();

    // 2. 准备监听器并发布 ApplicationStartingEvent
    SpringApplicationRunListeners listeners = getRunListeners(args);
    listeners.starting();

    // 3. 准备 Environment
    ConfigurableEnvironment environment = prepareEnvironment(listeners, applicationArguments);

    // 4. 打印 Banner
    Banner printedBanner = printBanner(environment);

    // 5. 创建 ApplicationContext(如 AnnotationConfigServletWebServerApplicationContext)
    context = createApplicationContext();

    // 6. 准备上下文:设置环境、执行 Initializer、加载启动类
    prepareContext(context, environment, listeners, applicationArguments, printedBanner);

    // 7. 刷新上下文(核心)—— 执行 BeanFactoryPostProcessor、注册 Bean、启动内嵌容器
    refreshContext(context);

    // 8. afterRefresh(扩展点)
    afterRefresh(context, applicationArguments);

    // 9. 回调 ApplicationRunner / CommandLineRunner
    callRunners(context, applicationArguments);

    // 10. 发布 ApplicationReadyEvent
    listeners.started(context);
}
👉 细节强调:
-
第 6 步
prepareContext会把启动类(@SpringBootApplication标注的类)注册为配置源。 -
第 7 步
refreshContext真正触发了 Spring 的核心refresh(),其中onRefresh()会调用createWebServer(),嵌入式 Tomcat 就在这里被创建并启动。 -
任何异常都会触发
ApplicationFailedEvent,确保监听器能感知失败。
🧩 一句话总结:
SpringApplication.run()是 Spring Boot 的“启动调度器”,它通过事件驱动的方式,把环境准备、上下文构建、容器刷新、扩展回调全部串联起来。理解了这张启动全景图,你就能自信地掌控应用启动顺序,自定义初始化逻辑或排查启动故障。
🐱 2. Spring Boot 内嵌 Tomcat 的启动原理?如何切换为 Undertow/Jetty?
2.1 内嵌 Tomcat 启动原理
内嵌 Tomcat 的启动巧妙地融合在 Spring 容器刷新流程 中,依赖两个核心要素:
-
自动配置注册工厂
ServletWebServerFactoryAutoConfiguration发现 classpath 下有tomcat-embed-core,就会自动注册一个TomcatServletWebServerFactoryBean,它是创建嵌入式 Tomcat 的工厂。 -
上下文触发的
onRefresh()ServletWebServerApplicationContext重写了onRefresh(),大致逻辑:
protected void onRefresh() {
    createWebServer(); // 获取工厂 → 创建并初始化 WebServer
}

private void createWebServer() {
    ServletWebServerFactory factory = getWebServerFactory(); // 拿到 TomcatServletWebServerFactory
    this.webServer = factory.getWebServer(getSelfInitializer()); // 创建 TomcatWebServer
    // TomcatWebServer 内部完成 Tomcat 实例化、Connector 配置、端口绑定、start()
}
-
Tomcat实例会被创建,设置Host、Context,并将DispatcherServlet等注册进去。 -
Tomcat.start()真正把连接器线程拉起来,开始监听端口。 -
整个流程在
refresh()的finishRefresh()前完成,确保WebServer就绪后,容器才宣告启动完毕。
2.2 切换为 Undertow 或 Jetty
Spring Boot 的可插拔设计让这一步几乎 零代码。以 Maven 为例:
- 排除默认的 Tomcat:
<dependency>
    <groupId>org.springframework.boot</groupId>
    <artifactId>spring-boot-starter-web</artifactId>
    <exclusions>
        <exclusion>
            <groupId>org.springframework.boot</groupId>
            <artifactId>spring-boot-starter-tomcat</artifactId>
        </exclusion>
    </exclusions>
</dependency>
引入 Undertow(高性能、内存占用低):
<dependency>
    <groupId>org.springframework.boot</groupId>
    <artifactId>spring-boot-starter-undertow</artifactId>
</dependency>
或 引入 Jetty(广泛用于嵌入式场景):
<dependency>
    <groupId>org.springframework.boot</groupId>
    <artifactId>spring-boot-starter-jetty</artifactId>
</dependency>
原理很简单:@ConditionalOnClass 检测到对应类(如 io.undertow.Undertow)存在时,自动配置就会注册 UndertowServletWebServerFactory 替代 Tomcat 工厂。后续 createWebServer() 链路不变,只是工厂实现不同。
✈️ 一句话总结:内嵌容器的核心是“Spring 容器驱动 Web 容器”——由自动配置提供工厂,由上下文刷新触发启动。而切换容器只需更换依赖,这是“习惯优于配置”的绝佳示范,也是自动装配价值最大化的体现。
⚡ 3. Agent 服务需要支持高并发 SSE 长连接,如何调优内嵌容器参数?
Agent 服务基于 SSE(Server-Sent Events)推送消息,典型特点是 HTTP 长连接 + 单向数据流。高并发下,如果仍用传统的“一个请求一个线程”模式,Tomcat 线程池会瞬间被耗光。调优需要从 连接器、异步线程模型、操作系统 三个维度进行组合拳。
3.1 启用并优化异步处理(核心中的核心)
Spring MVC 中返回 SseEmitter 实际上已经利用了 Servlet 3.1 异步特性:Tomcat 线程在提交异步任务后就释放回池,真正阻塞的是 异步线程。所以必须显式配置异步线程池:
spring:
  task:
    execution:
      pool:
        core-size: 20          # 常驻异步线程
        max-size: 100          # 峰值线程数
        queue-capacity: 500    # 等待队列
      thread-name-prefix: sse-task-
  mvc:
    async:
      request-timeout: -1     # 异步请求永不超时(SSE 连接需长期保持)
同时,创建 SseEmitter 时可以指定超时:
3.2 容器连接器参数调优(Tomcat 示例)
server:
  tomcat:
    # 最大连接数:操作系统能处理的连接上限,默认 8192,SSE 场景必须调高
    max-connections: 20000
    # 当所有工作线程都在忙时,新的连接进入等待队列
    accept-count: 1000
    # 工作线程数:异步模式下无需太大,因为线程很快释放
    threads:
      max: 200
      min-spare: 20
    # 连接超时:SSE 需要保持连接,建议关闭或设大
    connection-timeout: -1
    # keep-alive 保持长连接
    keep-alive-timeout: 60000
-
max-connections决定了同时能建立的 TCP 连接数,直接制约并发 SSE 连接量。 -
threads.max在异步模式下不需要开到几千,200 左右足够,因为每个请求只占用极短时间。 -
connection-timeout=-1避免 Tomcat 因“无数据”断开空闲连接,但记得真正的超时控制应在业务层(心跳机制)实现。
3.3 操作系统层面放行
SSE 长连接本质是占用文件描述符和内存。Linux 环境需确保:
如果使用 Docker,要记得 --ulimit nofile=65535:65535。否则连接数到达 1024 就会报 Too many open files。
3.4 考虑切换容器(进阶选择)
对于极高并发的 SSE,Undertow 在内存占用和长连接吞吐上通常优于 Tomcat(其基于 XNIO,线程模型更轻量)。如果想彻底解放并发能力,甚至可以用 WebFlux + Netty 完全非阻塞实现 SSE,一个 Netty EventLoop 线程就能管理上千条连接。
💡 一句话总结:高并发 SSE 的内核是“异步化 + 连接上限放开”,别让 Tomcat 工作线程成为瓶颈。参数调优只是“术”,理解异步执行模型才是“道”,双管齐下,Agent 服务才能稳健承载海量长连接,真正做到推送不延迟、不断流。
优雅停机
⚙️ 1. Spring Boot 优雅停机如何配置?
抛开版本不谈,从 Spring Boot 2.3.0 开始,优雅停机才真正变得开箱即用。核心配置只有两行,但背后要考虑的点不少。
基础配置(application.yml)
server:
  shutdown: graceful  # 开启优雅停机,默认 immediate(立即)

spring:
  lifecycle:
    timeout-per-shutdown-phase: 30s  # 每个生命周期阶段的最大等待时间
配置说明:
-
server.shutdown=graceful让内嵌容器(Tomcat/Jetty/Undertow)停止接收新请求,并等待正在处理的请求完成。 -
timeout-per-shutdown-phase是 Spring 容器销毁 Bean 时,每个Lifecycle阶段(如SmartLifecycle.stop())的超时时间。这并不意味着请求一定能执行 30 秒,而是给 smartLifecycle 组件一个优雅退出的窗口。
容器层微调(以 Tomcat 为例)
为了让优雅停机在连接器层面更丝滑,可以配合调整 Tomcat 参数:
server:
  tomcat:
    # 连接器暂停后,等待多久再真正关闭。需配合 shutdown=graceful 使用
    # 默认无此配置,但可通过自定义 TomcatConnectorCustomizer 实现
    # 一般在 Spring Boot 2.3+ 内部已自动处理
实际上 Spring Boot 会自动调用 TomcatWebServer 的优雅关闭方法,内部会暂停连接器,然后等待请求处理完毕。你如果不放心,可以写一个监听器精细化控制。
我一般还会在 k8s 里把
terminationGracePeriodSeconds设得比 Spring 的超时大一些,避免容器提前被 kill 掉。这一环扣一环的配置,才算是完整的优雅停机。
🧩 2. 底层原理:SmartLifecycle、ContextClosedEvent、ShutdownHook 各自的角色
我习惯把优雅停机的底层协作比作一场交响乐,有三个主角:
2.1 触发源头:ShutdownHook(JVM 关门前的最后哨兵)
当进程收到 SIGTERM 或正常结束时,JVM 会启动 ShutdownHook 线程。Spring Boot 启动时,通过 ApplicationContext 注册了一个钩子,里面只做一件事:
关闭 Spring 容器,即调用 context.close()。
-
角色:操作系统和 Spring 之间的桥梁,把 JVM 退出事件转化成 Spring 容器关闭动作。
-
注意:
kill -9或系统崩溃不会触发它,所以优雅停机只对“礼貌退出”有效。
2.2 事件广播:ContextClosedEvent(内部信号塔)
context.close() 执行时,Spring 会按顺序:
-
发布
ContextClosedEvent事件 —— 这让所有监听该事件的 Bean 能执行清理逻辑。 -
销毁所有单例 Bean(先执行
DisposableBean.destroy())。 -
触发
LifecycleProcessor.onClose(),开始执行SmartLifecycle的stop方法。
角色:生命周期事件的发布中心,让开发者可以解耦地感知关闭动作,比如记录日志、释放连接池、停止定时任务。
2.3 有序关闭的执行官:SmartLifecycle(优雅停机的骨架)
SmartLifecycle 继承自 Lifecycle,最关键的是增加了 阶段(phase)和是否自动启动/停止 的控制。在关闭时,所有 SmartLifecycle 的 stop() 方法会按照 phase 从大到小的逆序 调用。
举个例子:
-
内嵌 Web 服务器的生命周期实现,phase 一般设为
Integer.MAX_VALUE - ...很高的值,这样它会在 最后才停止,保证在它停止前,其他业务 Bean(如处理请求的控制器)还在。 -
而我们自定义的
SmartLifecycle,可以设置 phase 值,确保 先于 Web 服务器停止执行。
角色:提供了可控的关闭顺序。比如你的 Agent 服务可以在 stop() 中:
-
向所有活跃 SSE 客户端发送“服务即将重启”的最后一条消息,并关闭连接。
-
等待队列中的 LLM 调用结果返回或超时。
💡 这三者配合的精妙之处在于:ShutdownHook 负责“喊停”,ContextClosedEvent 负责“广播”,SmartLifecycle 负责“有序撤军”。 理解了这层关系,你就能任意定制任何复杂关闭逻辑了。
🔄 3. Agent 服务发布时,有正在进行的 SSE 长连接和 LLM 调用,如何实现无损下线?
这才是今天的重头戏。无损下线不是简单地调个配置,而是一套 “流量摘除 → 存量排空 → 进程退出” 的组合拳。
3.1 无损下线的前置工作:注册中心摘除(最关键的第一步)
服务实例准备下线时,必须先通知注册中心(Nacos/Eureka/Consul)把自己标记为不健康或直接摘除,让负载均衡不再分配新流量。这一步通常由 k8s preStop hook 或发布系统回调完成。
# k8s 示例
lifecycle:
  preStop:
    exec:
      command:
        - curl
        - -X POST
        - http://localhost:8080/actuator/service-registry?status=DOWN
这样,在 Spring 容器关闭之前,新请求已经进不来了,为存量请求的处理争取了时间窗口。
3.2 优雅停机配置 + 主动资源清理
在前面基础配置之上,我们要专门处理 SSE 和 LLM 调用的持久性逻辑。
针对 SSE 长连接
SSE 本质是一个永远不会结束的 HTTP 请求,返回 SseEmitter。如果服务器直接关闭,客户端会报错。我们需要主动完成它。
-
做法:监听
ContextClosedEvent或实现SmartLifecycle,在容器关闭时,遍历你维护的所有活跃的SseEmitter集合。 -
向每个
SseEmitter发送一个自定义的“服务即将停止”事件(如{event: "shutdown", data: "bye"}),然后调用emitter.complete()。 -
同时,你可以将
SseEmitter超时设置为和timeout-per-shutdown-phase接近的值,保证整体不卡死。
@Component
public class SseSessionManager implements ApplicationListener<ContextClosedEvent> {
    private final List<SseEmitter> emitters = new CopyOnWriteArrayList<>();

    @Override
    public void onApplicationEvent(ContextClosedEvent event) {
        for (SseEmitter emitter : emitters) {
            try {
                emitter.send(SseEmitter.event().name("shutdown").data("服务即将重启"));
                emitter.complete();
            } catch (Exception e) {
                emitter.completeWithError(e);
            }
        }
        emitters.clear();
    }
}
针对 LLM 调用
LLM 调用通常是异步或阻塞调用,必须等待它返回或达到超时。
-
如果你的 LLM 调用使用线程池(
AsyncTaskExecutor),需要配合SmartLifecycle停止线程池。 -
必须确保线程池关闭前,会尝试让现有任务执行完毕(调用
shutdown()再awaitTermination)。 -
同时,利用 OpenFeign 或 RestTemplate 的超时设置,避免无限期挂起。设置请求连接超时和读取超时,比如 10 秒,那么停机时最多等 10 秒。
3.3 给下线操作留出时间缓冲
即使配置了优雅停机,也要在容器编排层面预留时间。k8s 的 terminationGracePeriodSeconds 建议大于 spring.lifecycle.timeout-per-shutdown-phase 加上一点缓冲,例如设成 45 秒,避免被强制 SIGKILL。
整体下线时序图(简单文字描述)
-
preStop: 标记 /actuator/health 返回 OUT_OF_SERVICE。
-
等待约 5 秒(视流量情况而定),让注册中心同步,不再有新请求进入。
-
发送 SIGTERM,触发 ShutdownHook,Spring 开始优雅关闭。
-
ContextClosedEvent 发布 → 自定义监听器主动完成 SSE 连接并通知客户端。
-
SmartLifecycle.stop() 按顺序关闭线程池、等待 LLM 任务完成或超时。
-
内嵌 Web 服务器 phase 最高,最后才 stop,此时所有存量请求已处理完毕。
-
进程结束,容器退出。
真正做到无损,不是保证每个请求都能等到结果,而是让用户感知不到中断——即便断了,也能用最友好的方式提示重连。这才是面对 Agent 服务,最务实的下线哲学。
Actuator 可观测性
🔌 1. Spring Boot Actuator 有哪些常用的 Endpoint?如何保护敏感 Endpoint?
Actuator 自带几十个端点,我先按功能类型帮你筛一筛真正能用上的:
| 类型 | 端点 | 用途 |
|---|---|---|
| 健康与状态 | health、info | 存活/就绪探针、自定义状态展示 |
| 指标监控 | metrics、prometheus | 为 Micrometer 和 Prometheus 提供数据源 |
| 运行时调优 | loggers、env、configprops | 在线修改日志级别、查看环境变量和配置绑定 |
| 诊断排错 | heapdump、threaddump、mappings | 内存快照、线程栈、URL 映射排查 |
| 生命周期管理 | startup、restart(需额外依赖) | 分析启动耗时、重启上下文 |
✅ 保护敏感端点的 4 层防线
- 最小暴露原则
management:
  endpoints:
    web:
      exposure:
        include: health,info,metrics,prometheus  # 只暴露需要的
        exclude: env,heapdump
-
线上环境用白名单比黑名单安全得多。
-
端口隔离 把 Actuator 端口和应用端口分开,如
management.server.port=8081,然后在防火墙层只允许监控系统访问。 -
与 Spring Security 深度集成
http.requestMatchers(EndpointRequest.to("health", "info")).permitAll()
    .requestMatchers(EndpointRequest.toAnyEndpoint()).hasRole("ACTUATOR");
-
敏感操作如
loggers、env必须权限控制。 -
健康信息脱敏
- 这样只有授权用户才能看到磁盘空间、数据库状态等细节,避免信息泄露。
📊 2. 如何自定义 HealthIndicator 和 Micrometer 指标?指标如何接入 Prometheus?
自定义 HealthIndicator:把业务健康状况暴露出来
比如 Agent 依赖的 LLM 服务是否可达、向量数据库是否连接正常,都可以自己定义:
@Component
public class LLMHealthIndicator implements HealthIndicator {
    @Override
    public Health health() {
        // 模拟一次检测请求
        boolean llmReachable = checkLLMConnection();
        if (llmReachable) {
            return Health.up().withDetail("model", "gpt-4").build();
        }
        return Health.down().withDetail("error", "Connection timeout").build();
    }
}
在 /actuator/health 就能看到聚合结果,Kubernetes 的 liveness/readiness 探针可以直接用。
自定义 Micrometer 指标:把业务变成时序数据
核心就三种类型,覆盖大部分场景:
-
Counter:只增不减,计数用(成功次数、错误次数、Token 消耗量)
-
Timer:记录耗时和计数,适合看延迟分布
-
Gauge:瞬时值,如当前正在处理的请求数
在代码里通过 MeterRegistry 注册:
@RestController
public class LLMController {
    private final MeterRegistry registry;

    public LLMController(MeterRegistry registry) {
        this.registry = registry;
    }

    public String callLLM() {
        Timer.Sample sample = Timer.start(registry);
        try {
            String result = llmService.invoke();
            registry.counter("llm.calls", "status", "success").increment();
            return result;
        } catch (Exception e) {
            registry.counter("llm.calls", "status", "failure").increment();
            throw e;
        } finally {
            sample.stop(registry.timer("llm.call.duration"));
        }
    }
}
也可以用 @Timed 注解,但需要 AOP 支持,上面这种显式埋点更灵活,不丢上下文。
接入 Prometheus
-
依赖:
micrometer-registry-prometheus -
暴露端点:
/actuator/prometheus就绪 -
Prometheus 抓取配置:
scrape_configs:
  - job_name: 'agent-service'
    metrics_path: '/actuator/prometheus'
    static_configs:
      - targets: ['agent-svc:8081']
随后在 Grafana 里就能直接用 rate(llm_calls_total[1m]) 或 histogram_quantile(0.99, rate(llm_call_duration_seconds_bucket[5m])) 出图。
🤖 3. 如何用 Actuator 监控 Agent 服务的 LLM 调用成功率、Token 消耗量、工具调用延迟等核心指标?
这是整个回答的落地关键。一个 Agent 服务在推理、工具调用、回复生成等环节都有瓶颈点,我们要把核心交互变成可监控的黄金指标。
需要监控的指标清单
-
llm.calls(Counter,标签status=success|failure) → 调用成功率 -
llm.tokens(Counter,标签type=prompt|completion) → Token 消耗量及趋势 -
llm.call.duration(Timer) → LLM 响应延迟 P95/P99 -
tool.calls(Counter,标签tool_name、status) → 每个工具调用次数和成功率 -
tool.call.duration(Timer,标签tool_name) → 工具调用延迟
实现方式(以 AOP + Micrometer 为例)
定义一个注解 @MonitoredLLM,切面里统一埋点:
@Around("@annotation(monitoredLLM)")
public Object monitorLLM(ProceedingJoinPoint pjp, MonitoredLLM monitoredLLM) {
    Timer.Sample sample = Timer.start(meterRegistry);
    try {
        Object result = pjp.proceed();
        meterRegistry.counter("llm.calls", "status", "success").increment();
        // 假设能从返回值中获取 token 用量
        long tokens = extractTokens(result);
        meterRegistry.counter("llm.tokens", "type", "completion").increment(tokens);
        return result;
    } catch (Exception e) {
        meterRegistry.counter("llm.calls", "status", "failure").increment();
        throw e;
    } finally {
        sample.stop(Timer.builder("llm.call.duration")
                .publishPercentiles(0.95, 0.99)
                .register(meterRegistry));
    }
}
工具调用同理,用 tool.calls Counter 和 tool.call.duration Timer,标签区分工具名称。
在 Actuator 里验证
启动后访问 /actuator/metrics/llm.calls,可以看到带标签的成功失败次数。在 Grafana 中配面板:
-
成功率:
sum(rate(llm_calls_total{status="success"}[1m])) / sum(rate(llm_calls_total[1m])) -
Token 消耗趋势:
sum(rate(llm_tokens_total[5m])) -
LLM 调用 P99 延迟:
histogram_quantile(0.99, rate(llm_call_duration_seconds_bucket[5m])) -
告警规则:比如连续 3 分钟成功率低于 99%,就触发 PagerDuty。
进阶:结合健康检查做熔断
如果 LLM 的错误率超过阈值,可以在 LLMHealthIndicator 中读取 Micrometer 指标,动态将健康状态置为 DOWN,配合 Kubernetes 的 readinessProbe 自动摘除该实例,避免扩散雪崩。
把这些指标搭好之后,你甚至能画出一张 Agent 全景驾驶舱:左侧是对话请求 QPS,中间是 LLM 延迟和 Token 消耗趋势,右侧是各工具调用热力图。用数据驱动迭代,才是 Agent 服务从“能用”走向“可靠”的正确姿态。
Spring Boot 测试
1、基础题:@SpringBootTest 和 @WebMvcTest 有什么区别?各自适用什么场景?
难度级别:⭐⭐(集成测试、Slice 测试、Mock 依赖)
1️⃣ Common Answer
@SpringBootTest 是启动整个 Spring 容器的集成测试,@WebMvcTest 只测试 Web 层。@WebMvcTest 更快,因为它只加载 Controller 相关的 Bean。@SpringBootTest 适合测试完整流程,@WebMvcTest 适合测试 API。
2️⃣ Impressive Answer
- @SpringBootTest:
- 启动完整容器:加载整个应用上下文(包括 Controller、Service、Repository 等)。
- 适用场景:端到端测试、集成测试、需要测试多个组件协作的场景。
- 缺点:启动慢,依赖真实的外部服务(数据库、Redis 等)。
@SpringBootTest
@AutoConfigureMockMvc
public class AgentIntegrationTest {
    @Autowired
    private MockMvc mockMvc;

    @Test
    public void testExecuteTool() throws Exception {
        mockMvc.perform(post("/api/agent/execute")
                .contentType(MediaType.APPLICATION_JSON)
                .content("{\"tool\":\"weather\",\"params\":{\"city\":\"杭州\"}}"))
            .andExpect(status().isOk())
            .andExpect(jsonPath("$.result").exists());
    }
}
- @WebMvcTest:
- Slice 测试:只加载 Web 层(Controller、ControllerAdvice、Filter 等),不加载 Service 和 Repository。
- 自动 Mock:Service 层的 Bean 自动被 Mock,需要用 @MockBean 模拟行为。
- 适用场景:单元测试 Controller、测试 API 输入输出、验证异常处理。
@WebMvcTest(AgentController.class)
public class AgentControllerTest {
    @Autowired
    private MockMvc mockMvc;

    @MockBean
    private AgentService agentService;

    @Test
    public void testExecuteTool() throws Exception {
        when(agentService.executeTool(any()))
            .thenReturn(ToolResult.success("result"));

        mockMvc.perform(post("/api/agent/execute")
                .contentType(MediaType.APPLICATION_JSON)
                .content("{\"tool\":\"weather\",\"params\":{\"city\":\"杭州\"}}"))
            .andExpect(status().isOk())
            .andExpect(jsonPath("$.result").value("result"));
    }
}
- 其他 Slice 测试:
@DataJpaTest:只测试 JPA 层,自动配置嵌入式数据库(H2)。@JsonTest:只测试 JSON 序列化/反序列化。-
@WebFluxTest:测试 WebFlux Controller。 -
选择原则:
- 单元测试:优先用 Slice 测试(@WebMvcTest、@DataJpaTest)。
- 集成测试:用 @SpringBootTest,但尽量减少数量。
- 测试金字塔:70% 单元测试 → 20% 集成测试 → 10% 端到端测试。
3️⃣ Key Differences
| 维度 | Common Answer | Impressive Answer |
|---|---|---|
| 结构性 | 只说了区别和适用场景 | 包含代码示例、Slice 测试类型、测试金字塔 |
| 技术深度 | 不知道 Slice 测试的自动 Mock | 清楚 @MockBean 的工作机制 |
| 实践经验 | 没有测试金字塔概念 | 有测试策略和分层测试经验 |
| 面试官印象 | 知道测试注解 | 有完整的测试架构设计能力 |
2、进阶题:Spring Boot 测试的 Slice 测试(@DataJpaTest、@WebMvcTest 等)是如何实现的?如何 Mock 外部依赖?
1️⃣ Common Answer
Slice 测试就是只加载一部分 Bean,不加载整个容器。Mock 外部依赖用 @MockBean 注解,然后用 when().thenReturn() 模拟返回值。
2️⃣ Impressive Answer
- Slice 测试实现原理:
- 通过
@BootstrapWith指定自定义的TestContextBootstrapper。 TestContextBootstrapper根据@TestConfiguration和@Import过滤 BeanDefinition,只加载特定层的 Bean。-
例如
@WebMvcTest只加载@Controller、@ControllerAdvice、@Filter等注解的 Bean。 -
@MockBean 工作机制:
@MockBean通过MockitoPostProcessor在测试上下文中注册 Mockito Mock 对象。- Mock 对象会替换容器中同类型的真实 Bean(包括 @Primary 和 @Qualifier)。
-
支持按类型、按名称、按限定符匹配要替换的 Bean。
-
Mock 外部依赖示例:
@WebMvcTest(AgentController.class)
public class AgentControllerTest {
    @MockBean
    private AgentService agentService;

    @MockBean
    private LLMProvider llmProvider;  // Mock 外部 LLM 服务

    @Test
    public void testExecuteTool() {
        // Mock Service 层
        when(agentService.executeTool(any()))
            .thenReturn(ToolResult.success("result"));

        // Mock 外部 LLM 服务
        when(llmProvider.chat(anyString(), anyString()))
            .thenReturn("AI response");
    }
}
- @SpyBean vs @MockBean:
@MockBean:完全 Mock,所有方法默认返回默认值(null、0、false)。-
@SpyBean:部分 Mock,真实方法会被调用,可以when(spy.method()).thenCallRealMethod()。 -
Mock 静态方法(Mockito 3.4+):
@Test
public void testStaticMethod() {
    try (MockedStatic<UUID> mocked = mockStatic(UUID.class)) {
        mocked.when(UUID::randomUUID).thenReturn(uuid);
        // 测试代码
    }
}
3️⃣ Key Differences
| 维度 | Common Answer | Impressive Answer |
|---|---|---|
| 结构性 | 只说了 MockBean | 包含实现原理、SpyBean、静态方法 Mock |
| 技术深度 | 不知道 TestContextBootstrapper | 清楚 Slice 测试的过滤机制 |
| 实践经验 | 没有静态方法 Mock | 有完整的 Mock 技术栈经验 |
| 面试官印象 | 会用 Mock | 理解测试框架的底层机制 |
3、场景题:Agent 服务的工具调用逻辑需要单元测试,但工具调用依赖外部 LLM API,如何用 Mockito + @MockBean 实现隔离测试?
难度级别:⭐⭐⭐(隔离测试、Mock 链式调用、参数匹配、异常测试)
1️⃣ Common Answer
可以用 @MockBean 把 LLM Provider Mock 掉,然后用 when().thenReturn() 模拟返回值。测试时调用工具执行方法,验证返回结果是否符合预期。
2️⃣ Impressive Answer
- 工具调用服务设计:
@Service
public class ToolExecutor {
    private final LLMProvider llmProvider;

    public ToolExecutor(LLLMProvider llmProvider) {
        this.llmProvider = llmProvider;
    }

    public ToolResult execute(ToolCall call) {
        try {
            String prompt = buildPrompt(call);
            String response = llmProvider.chat(prompt, call.getModel());
            return parseResponse(response);
        } catch (LLMException e) {
            return ToolResult.error(e.getMessage());
        }
    }
}
- 隔离测试实现:
@ExtendWith(MockitoExtension.class)
public class ToolExecutorTest {

    @Mock
    private LLMProvider llmProvider;

    @InjectMocks
    private ToolExecutor toolExecutor;

    @Test
    public void testExecuteSuccess() {
        // 准备测试数据
        ToolCall call = ToolCall.builder()
            .tool("weather")
            .params(Map.of("city", "杭州"))
            .build();

        // Mock 外部依赖
        when(llmProvider.chat(
            startsWith("查询杭州的天气"),
            eq("gpt-4")
        )).thenReturn("{\"temperature\": 25, \"weather\": \"晴\"}");

        // 执行测试
        ToolResult result = toolExecutor.execute(call);

        // 验证结果
        assertThat(result.isSuccess()).isTrue();
        assertThat(result.getData()).containsEntry("temperature", 25);

        // 验证 Mock 被调用
        verify(llmProvider, times(1))
            .chat(anyString(), eq("gpt-4"));
    }

    @Test
    public void testExecuteFailure() {
        ToolCall call = ToolCall.builder()
            .tool("weather")
            .params(Map.of("city", "杭州"))
            .build();

        // Mock 异常情况
        when(llmProvider.chat(anyString(), anyString()))
            .thenThrow(new LLMException("API rate limit exceeded"));

        ToolResult result = toolExecutor.execute(call);

        assertThat(result.isError()).isTrue();
        assertThat(result.getError()).contains("rate limit");
    }

    @Test
    public void testExecuteWithMultipleCalls() {
        // Mock 多次调用返回不同结果
        when(llmProvider.chat(anyString(), anyString()))
            .thenReturn("{\"result\": \"first\"}")
            .thenReturn("{\"result\": \"second\"}");

        ToolResult result1 = toolExecutor.execute(call1);
        ToolResult result2 = toolExecutor.execute(call2);

        assertThat(result1.getData()).containsEntry("result", "first");
        assertThat(result2.getData()).containsEntry("result", "second");
    }
}
- 参数匹配器:
// 精确匹配
when(llmProvider.chat("exact prompt", "gpt-4")).thenReturn(...);

// 任意参数
when(llmProvider.chat(anyString(), anyString())).thenReturn(...);

// 部分匹配
when(llmProvider.chat(
    startsWith("查询"),
    endsWith("-4")
)).thenReturn(...);

// 自定义匹配器
when(llmProvider.chat(argThat(prompt -> prompt.length() > 10), anyString()))
    .thenReturn(...);
- 验证调用次数和顺序:
// 验证调用次数
verify(llmProvider, times(2)).chat(anyString(), anyString());
verify(llmProvider, never()).chat(eq("forbidden"), anyString());
verify(llmProvider, atLeastOnce()).chat(anyString(), anyString());

// 验证调用顺序
InOrder inOrder = inOrder(llmProvider);
inOrder.verify(llmProvider).chat(eq("first"), anyString());
inOrder.verify(llmProvider).chat(eq("second"), anyString());
- 集成测试(@SpringBootTest):
@SpringBootTest
@AutoConfigureMockMvc
public class ToolExecutionIntegrationTest {
    @Autowired
    private MockMvc mockMvc;

    @MockBean
    private LLMProvider llmProvider;

    @Test
    public void testToolExecutionApi() throws Exception {
        when(llmProvider.chat(anyString(), anyString()))
            .thenReturn("{\"result\": \"test\"}");

        mockMvc.perform(post("/api/tools/execute")
                .contentType(MediaType.APPLICATION_JSON)
                .content("{\"tool\":\"weather\",\"params\":{\"city\":\"杭州\"}}"))
            .andExpect(status().isOk())
            .andExpect(jsonPath("$.data.result").value("test"));
    }
}
3️⃣ Key Differences
| 维度 | Common Answer | Impressive Answer |
|---|---|---|
| 结构性 | 只说了基本的 Mock | 包含参数匹配、验证、异常测试、集成测试 |
| 技术深度 | 不知道参数匹配器 | 清楚 Mockito 的完整 API |
| 实践经验 | 没有验证调用次数 | 有完整的测试覆盖经验 |
| 面试官印象 | 会写单元测试 | 有测试驱动开发的工程化能力 |
4、容易一起考的题
| 关联题 | 和本题的关系 |
|---|---|
| JUnit 5 的新特性有哪些? | 单元测试框架的演进 |
| 如何测试私有方法? | 测试边界情况的讨论 |
| 测试覆盖率如何计算? | 测试质量的评估指标 |
条件注解与自动装配扩展
1、基础题:@Conditional 家族注解有哪些?各自的使用场景是什么?
难度级别:⭐⭐(条件注解、自动装配条件控制)
1️⃣ Common Answer
@ConditionalOnClass 是类路径上有这个类才生效,@ConditionalOnMissingBean 是没有这个 Bean 才生效。这些注解用在自动配置类上,控制 Bean 是否创建。
2️⃣ Impressive Answer
- 类路径条件:
@ConditionalOnClass:类路径上存在指定类时生效(如@ConditionalOnClass(Tomcat.class))-
@ConditionalOnMissingClass:类路径上不存在指定类时生效 -
Bean 条件:
@ConditionalOnBean:容器中存在指定 Bean 时生效@ConditionalOnMissingBean:容器中不存在指定 Bean 时生效(用户自定义优先的核心机制)-
@ConditionalOnSingleCandidate:容器中只有一个候选 Bean 时生效 -
配置条件:
@ConditionalOnProperty:配置文件中存在指定属性且值匹配时生效
// 通过配置开关控制功能启停
@ConditionalOnProperty(
    prefix = "agent.tool",
    name = "enabled",
    havingValue = "true",
    matchIfMissing = true  // 没有配置时默认生效
)
@Bean
public WeatherTool weatherTool() {
    return new WeatherTool();
}
- 环境条件:
@ConditionalOnExpression:SpEL 表达式为 true 时生效-
@Profile:激活指定 Profile 时生效(本质是@Conditional(ProfileCondition.class)) -
Web 条件:
@ConditionalOnWebApplication:是 Web 应用时生效-
@ConditionalOnNotWebApplication:不是 Web 应用时生效 -
自定义 Condition:
public class OnLLMProviderCondition implements Condition {

    @Override
    public boolean matches(ConditionContext context, AnnotatedTypeMetadata metadata) {
        Environment env = context.getEnvironment();
        String provider = env.getProperty("agent.llm.provider");
        // 只有配置了 provider 才加载对应的 Bean
        return provider != null && !provider.isEmpty();
    }
}

@Conditional(OnLLMProviderCondition.class)
@Bean
public LLMClient llmClient() {
    return new LLMClient();
}
3️⃣ Key Differences
| 维度 | Common Answer | Impressive Answer |
|---|---|---|
| 结构性 | 只说了两个注解 | 6 大类条件注解,覆盖所有场景 |
| 技术深度 | 不知道 matchIfMissing | 清楚各注解的细节参数 |
| 实践经验 | 没有自定义 Condition | 有完整的自定义条件实现 |
| 面试官印象 | 背过注解名 | 理解条件注解的设计意图 |
2、进阶题:@ConditionalOnMissingBean 的判断时机是什么?为什么用户自定义的 Bean 能覆盖自动配置?
难度级别:⭐⭐⭐(Bean 注册顺序、DeferredImportSelector、自动配置优先级)
1️⃣ Common Answer
因为用户的 Bean 先注册,自动配置的 Bean 后注册,@ConditionalOnMissingBean 检查到已经有了就不创建了。
2️⃣ Impressive Answer
- 核心机制:DeferredImportSelector:
AutoConfigurationImportSelector实现了DeferredImportSelector,延迟到所有@Configuration类处理完之后才执行。- 用户的
@Configuration类(通过@ComponentScan扫描)先于自动配置类处理。 -
因此用户的 Bean 先注册到容器,自动配置类执行时
@ConditionalOnMissingBean检查到已有 Bean,跳过创建。 -
判断时机:
@ConditionalOnMissingBean的判断发生在 BeanDefinition 注册阶段,而非 Bean 实例化阶段。-
ConditionEvaluator在处理每个@Bean方法时调用Condition.matches(),此时已注册的 BeanDefinition 都可以被检测到。 -
正确覆盖姿势:
// 用户自定义配置,覆盖自动配置的 DataSource
@Configuration
public class MyDataSourceConfig {

    @Bean
    // 不需要加任何条件注解,因为自动配置的 DataSource 有 @ConditionalOnMissingBean
    public DataSource dataSource() {
        return new HikariDataSource(myConfig());
    }
}
- 常见陷阱:
@ConditionalOnMissingBean只检查当前已注册的 BeanDefinition,如果两个自动配置类都没有@ConditionalOnMissingBean保护,会导致 Bean 重复注册冲突。
3️⃣ Key Differences
| 维度 | Common Answer | Impressive Answer |
|---|---|---|
| 结构性 | 只说了"先后顺序" | DeferredImportSelector 机制 + 判断时机 + 陷阱 |
| 技术深度 | 不知道 DeferredImportSelector | 清楚延迟导入的设计意图 |
| 实践经验 | 不知道判断发生在哪个阶段 | 清楚 BeanDefinition 注册阶段的判断逻辑 |
| 面试官印象 | 知道结论但不知道原因 | 理解 Spring Boot 自动配置的核心设计 |
3、容易一起考的题
| 关联题 | 和本题的关系 |
|---|---|
| Spring Boot 自动装配的完整链路? | 条件注解是自动装配的核心控制机制 |
| BeanDefinition 的注册流程? | 条件注解判断发生在 BeanDefinition 注册阶段 |
| 如何自定义一个 Spring Boot Starter? | Starter 的核心就是条件注解的合理使用 |
配置绑定机制
1、基础题:@ConfigurationProperties 和 @Value 有什么区别?各自适用什么场景?
难度级别:⭐⭐(配置绑定、类型安全、松散绑定)
1️⃣ Common Answer
@Value 是注入单个配置项,@ConfigurationProperties 是批量绑定一组配置。@ConfigurationProperties 支持 POJO 绑定,@Value 支持 SpEL 表达式。
2️⃣ Impressive Answer
- 核心区别对比:
| 维度 | @Value | @ConfigurationProperties |
|---|---|---|
| 绑定粒度 | 单个属性 | 整个前缀下的属性组 |
| 类型安全 | 不支持(运行时失败) | 支持(启动时校验) |
| 松散绑定 | 不支持 | 支持(server-port = serverPort) |
| SpEL 表达式 | 支持 | 不支持 |
| 元数据提示 | 不支持 | 支持(IDE 自动补全) |
| 适用场景 | 少量、简单配置 | 模块化配置、复杂对象 |
- @ConfigurationProperties 最佳实践:
@ConfigurationProperties(prefix = "agent.llm")
@Validated  // 开启 JSR-303 校验
public class LLMProperties {

    @NotBlank
    private String apiKey;

    @Min(1)
    @Max(4096)
    private int maxTokens = 2048;

    private double temperature = 0.7;

    private List<String> models = new ArrayList<>();

    // getter/setter 省略
}

// 注册到容器(二选一)
@EnableConfigurationProperties(LLMProperties.class)
// 或者在类上加 @Component
-
松散绑定规则:
agent.llm.api-key、agent.llm.apiKey、AGENT_LLM_API_KEY(环境变量)都能绑定到apiKey字段。 -
@Value 的 SpEL 能力:
// 支持默认值
@Value("${agent.timeout:30}")
private int timeout;

// 支持 SpEL 表达式
@Value("#{${agent.weights}}")
private Map<String, Double> weights;
- Agent 场景:LLM 配置(API Key、模型参数、超时)用
@ConfigurationProperties统一管理,支持多环境切换和配置校验,避免启动后才发现配置错误。
3️⃣ Key Differences
| 维度 | Common Answer | Impressive Answer |
|---|---|---|
| 结构性 | 只说了"批量 vs 单个" | 完整对比表 + 代码示例 + 松散绑定规则 |
| 技术深度 | 不知道松散绑定 | 清楚三种命名格式都能绑定 |
| 实践经验 | 没有 @Validated 校验 | 有启动时配置校验的最佳实践 |
| 面试官印象 | 知道区别 | 理解配置绑定的工程化最佳实践 |
2、进阶题:Spring Boot 的 Environment 抽象是什么?PropertySource 的优先级如何工作?
难度级别:⭐⭐⭐(Environment、PropertySource、配置覆盖机制)
1️⃣ Common Answer
Environment 是 Spring 的环境抽象,可以获取配置属性。PropertySource 是配置源,有多个配置源时按优先级取值,命令行参数优先级最高。
2️⃣ Impressive Answer
- Environment 抽象层次:
Environment接口:提供getProperty()、containsProperty()、getActiveProfiles()等方法。ConfigurableEnvironment:可以添加/删除PropertySource,获取MutablePropertySources。StandardEnvironment:非 Web 环境,包含系统属性和环境变量两个 PropertySource。-
StandardServletEnvironment:Web 环境,额外包含 Servlet 配置和上下文参数。 -
PropertySource 优先级链(从高到低):
命令行参数(CommandLinePropertySource)
  ↓
Servlet 配置参数(ServletConfig/ServletContext)
  ↓
JNDI 属性
  ↓
Java 系统属性(System.getProperties())
  ↓
系统环境变量(System.getenv())
  ↓
application-{profile}.yml(激活的 Profile)
  ↓
application.yml(默认配置)
  ↓
@PropertySource 注解引入的配置
  ↓
默认属性(SpringApplication.setDefaultProperties())
- 自定义 PropertySource:
@Component
public class NacosPropertySourceLoader implements EnvironmentPostProcessor {

    @Override
    public void postProcessEnvironment(ConfigurableEnvironment environment,
                                       SpringApplication application) {
        // 从 Nacos 加载配置,插入到高优先级位置
        Map<String, Object> nacosProperties = loadFromNacos();
        MapPropertySource nacosSource =
            new MapPropertySource("nacos", nacosProperties);

        // addFirst 保证 Nacos 配置优先级最高(仅次于命令行)
        environment.getPropertySources().addFirst(nacosSource);
    }
}
- EnvironmentPostProcessor 注册:在
META-INF/spring.factories中注册(Boot 2.x)或META-INF/spring/org.springframework.boot.env.EnvironmentPostProcessor.imports(Boot 3.x)。
3️⃣ Key Differences
| 维度 | Common Answer | Impressive Answer |
|---|---|---|
| 结构性 | 只说了"命令行最高" | 完整优先级链 + Environment 层次 + 自定义扩展 |
| 技术深度 | 不知道 EnvironmentPostProcessor | 清楚配置中心集成的扩展点 |
| 实践经验 | 没有自定义 PropertySource | 有 Nacos 集成的完整实现思路 |
| 面试官印象 | 知道优先级 | 理解 Environment 抽象的扩展机制 |
3、容易一起考的题
| 关联题 | 和本题的关系 |
|---|---|
| Spring Boot 配置加载优先级? | PropertySource 优先级的具体体现 |
| Nacos/Apollo 配置中心如何集成? | 自定义 PropertySource 的典型应用 |
| @RefreshScope 动态刷新原理? | 配置变更后如何让 Bean 感知到 |
Spring Boot 事件机制
1、基础题:Spring Boot 有哪些内置的应用事件?发布顺序是什么?
难度级别:⭐⭐(ApplicationEvent、事件发布顺序、监听器)
1️⃣ Common Answer
Spring Boot 有 ApplicationStartedEvent、ApplicationReadyEvent 等事件,可以用 @EventListener 监听。启动完成后会发布 ApplicationReadyEvent。
2️⃣ Impressive Answer
- Spring Boot 启动事件完整顺序:
ApplicationStartingEvent        → SpringApplication.run() 刚开始,容器还未创建
ApplicationEnvironmentPreparedEvent → Environment 准备完成,配置已加载
ApplicationContextInitializedEvent  → ApplicationContext 创建完成,Initializer 执行完
ApplicationPreparedEvent        → BeanDefinition 加载完成,Bean 还未实例化
ApplicationStartedEvent         → refreshContext 完成,Bean 已实例化
ApplicationReadyEvent           → Runner 执行完成,应用完全就绪
ApplicationFailedEvent          → 启动失败时发布
- 监听方式:
// 方式一:@EventListener 注解(容器刷新后的事件)
@Component
public class AgentStartupListener {

    @EventListener(ApplicationReadyEvent.class)
    public void onApplicationReady(ApplicationReadyEvent event) {
        // 应用完全就绪后,预热 LLM 连接池
        llmClient.warmUp();
    }
}

// 方式二:实现 ApplicationListener 接口(可监听容器刷新前的事件)
public class EnvironmentPreparedListener
        implements ApplicationListener<ApplicationEnvironmentPreparedEvent> {

    @Override
    public void onApplicationEvent(ApplicationEnvironmentPreparedEvent event) {
        // 容器刷新前,可以修改 Environment
        ConfigurableEnvironment env = event.getEnvironment();
        // 动态注入配置
    }
}
-
注意事项:
ApplicationStartingEvent和ApplicationEnvironmentPreparedEvent发布时容器还未创建,不能用 @EventListener,必须通过SpringApplication.addListeners()或spring.factories注册。 -
自定义事件:
// 定义事件
public class LLMCallCompletedEvent extends ApplicationEvent {
    private final String model;
    private final int tokensUsed;

    public LLMCallCompletedEvent(Object source, String model, int tokensUsed) {
        super(source);
        this.model = model;
        this.tokensUsed = tokensUsed;
    }
}

// 发布事件
@Autowired
private ApplicationEventPublisher eventPublisher;

eventPublisher.publishEvent(new LLMCallCompletedEvent(this, "gpt-4", 512));

// 监听事件
@EventListener
public void onLLMCallCompleted(LLMCallCompletedEvent event) {
    metricsService.recordTokenUsage(event.getModel(), event.getTokensUsed());
}
3️⃣ Key Differences
| 维度 | Common Answer | Impressive Answer |
|---|---|---|
| 结构性 | 只说了几个事件名 | 完整顺序 + 两种监听方式 + 注意事项 |
| 技术深度 | 不知道容器刷新前的事件限制 | 清楚哪些事件不能用 @EventListener |
| 实践经验 | 没有自定义事件 | 有完整的自定义事件发布/监听实现 |
| 面试官印象 | 背过事件名 | 理解事件机制的完整链路和限制 |
2、进阶题:ApplicationRunner 和 CommandLineRunner 有什么区别?执行时机是什么?
难度级别:⭐⭐(Runner 接口、启动后执行、执行顺序)
1️⃣ Common Answer
ApplicationRunner 和 CommandLineRunner 都是启动完成后执行的,区别是参数类型不同。ApplicationRunner 的参数是 ApplicationArguments,CommandLineRunner 是 String[]。
2️⃣ Impressive Answer
- 核心区别:
| 维度 | CommandLineRunner | ApplicationRunner |
|---|---|---|
| 参数类型 | String[](原始命令行参数) | ApplicationArguments(结构化参数) |
| 参数解析 | 需要手动解析 --key=value | 自动解析,支持 getOptionValues("key") |
| 适用场景 | 简单脚本、参数不复杂 | 需要解析命名参数的场景 |
-
执行时机:在
ApplicationStartedEvent之后、ApplicationReadyEvent之前执行,此时容器已完全刷新,所有 Bean 已就绪。 -
执行顺序控制:通过
@Order注解控制多个 Runner 的执行顺序(值越小越先执行)。
@Component
@Order(1)
public class DatabaseInitRunner implements ApplicationRunner {

    @Override
    public void run(ApplicationArguments args) throws Exception {
        // 先初始化数据库
        if (args.containsOption("init-db")) {
            databaseService.initialize();
        }
    }
}

@Component
@Order(2)
public class LLMWarmUpRunner implements CommandLineRunner {

    @Override
    public void run(String... args) throws Exception {
        // 后预热 LLM 连接
        llmClient.warmUp();
    }
}
- Agent 场景:启动时预加载 Embedding 模型、预热向量数据库连接、初始化工具注册表,避免第一次请求时的冷启动延迟。
3️⃣ Key Differences
| 维度 | Common Answer | Impressive Answer |
|---|---|---|
| 结构性 | 只说了参数类型区别 | 对比表 + 执行时机 + 顺序控制 + 场景 |
| 技术深度 | 不知道执行时机 | 清楚在哪两个事件之间执行 |
| 实践经验 | 没有 @Order 控制 | 有多 Runner 顺序控制的实践 |
| 面试官印象 | 知道区别 | 理解 Runner 在启动流程中的定位 |
3、容易一起考的题
| 关联题 | 和本题的关系 |
|---|---|
| Spring Boot 启动流程? | 事件和 Runner 都是启动流程的组成部分 |
| @PostConstruct 和 ApplicationRunner 的区别? | 启动后执行逻辑的不同方式对比 |
| Spring 的事件驱动模型(观察者模式)? | 事件机制的设计模式基础 |
3.8 Spring Boot 3.x 新特性
1、基础题:Spring Boot 3.x 相比 2.x 有哪些重要变化?
难度级别:⭐⭐(版本迁移、Jakarta EE、Java 17 基线)
1️⃣ Common Answer
Spring Boot 3.x 要求 Java 17,把 javax 包改成了 jakarta 包。自动配置的注册文件也变了,从 spring.factories 迁移到新的文件。
2️⃣ Impressive Answer
- 基础要求升级:
- Java 17 基线:不再支持 Java 8/11,可以使用 Record、Sealed Class、Pattern Matching 等新特性。
- Jakarta EE 10:所有
javax.*包迁移到jakarta.*(如javax.servlet→jakarta.servlet),这是最大的迁移成本。 -
Spring Framework 6.x:底层框架同步升级。
-
自动配置机制变化:
- 废弃
spring.factories的EnableAutoConfiguration入口。 - 迁移到
META-INF/spring/org.springframework.boot.autoconfigure.AutoConfiguration.imports。 -
新增
@AutoConfiguration注解替代@Configuration,语义更清晰。 -
AOT(Ahead-of-Time)编译支持:
- Spring Boot 3.x 内置 AOT 处理器,在构建时分析 Bean 定义,生成静态代码。
- 为 GraalVM 原生镜像编译提供支持,大幅减少反射使用。
-
mvn spring-boot:build-image可直接构建原生镜像。 -
可观测性增强:
- 内置 Micrometer Tracing(替代 Spring Cloud Sleuth),支持分布式链路追踪。
-
自动集成 OpenTelemetry,无需额外配置。
-
其他重要变化:
HttpExchange接口替代 Feign,声明式 HTTP 客户端内置支持。- 问题详情(RFC 7807)支持,
ProblemDetail标准化错误响应。 @ControllerAdvice支持函数式异常处理。
3️⃣ Key Differences
| 维度 | Common Answer | Impressive Answer |
|---|---|---|
| 结构性 | 只说了 Java 17 和 jakarta | 5 大变化:基础要求+自动配置+AOT+可观测性+其他 |
| 技术深度 | 不知道 AOT 编译 | 清楚 AOT 对 GraalVM 原生镜像的意义 |
| 实践经验 | 不知道迁移成本 | 知道 javax→jakarta 是最大迁移成本 |
| 面试官印象 | 知道版本号 | 理解版本升级的技术演进方向 |
2、进阶题:Spring Boot 3.x 的 AOT 编译和 GraalVM 原生镜像是什么?有什么优缺点?
难度级别:⭐⭐⭐(AOT、GraalVM、原生镜像、冷启动优化)
1️⃣ Common Answer
GraalVM 可以把 Java 程序编译成原生可执行文件,启动速度很快,内存占用少。但是编译时间很长,而且有些反射代码会有问题。
2️⃣ Impressive Answer
- AOT vs JIT 对比:
- JIT(Just-In-Time):运行时编译,启动慢(需要 JVM 预热),但长期运行性能好。
-
AOT(Ahead-of-Time):构建时编译,启动极快(毫秒级),内存占用低,但失去 JIT 优化。
-
Spring Boot AOT 处理流程:
mvn spring-boot:process-aot
  ↓
AOT 处理器分析 BeanDefinition
  ↓
生成静态 Bean 注册代码(替代反射)
  ↓
生成 GraalVM 反射配置(reflect-config.json)
  ↓
GraalVM native-image 编译
  ↓
原生可执行文件(无需 JVM)
- 性能对比:
| 指标 | JVM 模式 | GraalVM 原生镜像 |
|---|---|---|
| 启动时间 | 2-10 秒 | 50-200 毫秒 |
| 内存占用 | 200-500 MB | 50-100 MB |
| 峰值吞吐量 | 高(JIT 优化) | 较低(无 JIT) |
| 编译时间 | 秒级 | 分钟级 |
| 动态特性 | 完全支持 | 受限(反射需配置) |
- Agent 场景适用性:
- 适合:Serverless 函数、CLI 工具、冷启动敏感的场景(如 K8s 快速扩容)。
-
不适合:需要动态加载类、大量反射的 Agent 框架(如 LangChain4J 的动态代理)。
-
常见问题:反射、动态代理、序列化需要额外配置
reflect-config.json;第三方库兼容性问题(需要 GraalVM 支持)。
3️⃣ Key Differences
| 维度 | Common Answer | Impressive Answer |
|---|---|---|
| 结构性 | 只说了优缺点 | AOT 流程 + 性能对比表 + 场景适用性 |
| 技术深度 | 不知道 AOT 处理流程 | 清楚 Spring Boot AOT 的完整编译链路 |
| 实践经验 | 不知道 Agent 场景的适用性 | 有 Serverless vs 长期运行的选型判断 |
| 面试官印象 | 知道原生镜像 | 理解 AOT 的工程权衡 |
3、场景题:Agent 服务需要快速冷启动(K8s 弹性扩容),如何用 Spring Boot 3.x 优化启动时间?
难度级别:⭐⭐⭐(启动优化、懒加载、AOT、类路径扫描优化)
1️⃣ Common Answer
可以用 GraalVM 原生镜像,启动很快。也可以开启懒加载,减少启动时加载的 Bean 数量。
2️⃣ Impressive Answer
- 启动优化分层策略:
- 第二层:减少类路径扫描范围:
- 第三层:排除不需要的自动配置:
@SpringBootApplication(exclude = {
    DataSourceAutoConfiguration.class,    // 不用数据库
    SecurityAutoConfiguration.class,      // 不用 Security
    FlywayAutoConfiguration.class         // 不用数据库迁移
})
- 第四层:AOT + 原生镜像(终极方案):
<!-- pom.xml -->
<plugin>
    <groupId>org.graalvm.buildtools</groupId>
    <artifactId>native-maven-plugin</artifactId>
</plugin>
- 启动时间基准测试:
| 优化手段 | 启动时间 | 适用场景 |
|---|---|---|
| 无优化 | 5-10s | 开发环境 |
| 懒加载 | 2-4s | 生产环境(简单) |
| 排除自动配置 | 1-3s | 生产环境(精细化) |
| AOT 编译(JVM) | 1-2s | 生产环境(推荐) |
| GraalVM 原生镜像 | 50-200ms | Serverless/弹性扩容 |
- 懒加载的风险:懒加载会把配置错误推迟到运行时才暴露,建议在测试环境关闭懒加载,生产环境开启。
3️⃣ Key Differences
| 维度 | Common Answer | Impressive Answer |
|---|---|---|
| 结构性 | 只说了两个方案 | 4 层递进优化策略 + 基准测试数据 |
| 技术深度 | 不知道懒加载的风险 | 清楚懒加载推迟错误暴露的问题 |
| 实践经验 | 没有量化数据 | 有各方案的启动时间对比 |
| 面试官印象 | 知道方向 | 有系统性的启动优化方案 |
4、容易一起考的题
| 关联题 | 和本题的关系 |
|---|---|
| Spring Boot 2.x 升级到 3.x 的迁移注意事项? | 版本迁移的工程实践 |
| GraalVM 和 JVM 的区别? | AOT 编译的底层原理 |
| K8s 的 HPA(水平自动扩缩容)如何配置? | 弹性扩容场景下的启动时间要求 |
3.9 Spring Boot 启动优化与性能调优
1、基础题:Spring Boot 应用启动慢的常见原因有哪些?如何排查?
难度级别:⭐⭐(启动性能、Bean 扫描、自动配置)
1️⃣ Common Answer
启动慢可能是 Bean 太多,或者扫描范围太大。可以用 --debug 参数看自动配置报告,找出哪些配置类生效了。
2️⃣ Impressive Answer
- 常见原因分析:
- 类路径扫描范围过大:
@ComponentScan扫描了不必要的包,包含大量第三方 jar。 - 自动配置过多:加载了不需要的自动配置类(如引入了 spring-boot-starter-data-jpa 但不用数据库)。
- Bean 初始化耗时:某些 Bean 的
@PostConstruct或构造函数有耗时操作(如建立连接、加载模型)。 -
AOP 代理创建:大量
@Transactional、@Async注解导致代理对象创建耗时。 -
排查工具:
# 开启启动时间详细日志
java -jar app.jar --debug

# 使用 Spring Boot Actuator 的 startup 端点
management.endpoint.startup.enabled=true
# GET /actuator/startup 查看每个步骤的耗时
- Spring Boot 启动耗时分析:
// 自定义 ApplicationStartup 记录启动步骤耗时
@SpringBootApplication
public class AgentApplication {

    public static void main(String[] args) {
        SpringApplication app = new SpringApplication(AgentApplication.class);
        // 记录详细的启动步骤
        app.setApplicationStartup(new BufferingApplicationStartup(2048));
        app.run(args);
    }
}
- 快速定位方法:
- 看
refreshContext耗时(Bean 实例化阶段) - 用
@PostConstruct打时间戳,找出耗时的 Bean 初始化 - 检查是否有同步的网络调用(如启动时连接外部服务)
3️⃣ Key Differences
| 维度 | Common Answer | Impressive Answer |
|---|---|---|
| 结构性 | 只说了"Bean 太多" | 4 大原因 + 排查工具 + 定位方法 |
| 技术深度 | 不知道 ApplicationStartup | 清楚启动耗时分析的完整工具链 |
| 实践经验 | 没有具体排查步骤 | 有系统性的排查方法论 |
| 面试官印象 | 知道方向 | 有生产环境性能排查经验 |
2、进阶题:Spring Boot DevTools 的热部署原理是什么?为什么生产环境要禁用?
难度级别:⭐⭐⭐(类加载器、热部署、双亲委派)
1️⃣ Common Answer
DevTools 可以在代码改变后自动重启应用,不用手动重启。生产环境要禁用是因为会影响性能,而且有安全风险。
2️⃣ Impressive Answer
- 热部署核心原理——双类加载器机制:
- Base ClassLoader:加载不会变化的类(第三方 jar、Spring 框架本身)。
- Restart ClassLoader:加载开发者自己的类(
classpath下的 class 文件)。 -
文件变化时,只丢弃并重建
Restart ClassLoader,Base ClassLoader保留,因此比完整重启快得多。 -
触发机制:
- 监听
classpath下的文件变化(IDE 编译后触发)。 -
默认排除静态资源(
/static、/public、/templates)的变化,避免频繁重启。 -
LiveReload 功能:DevTools 内置 LiveReload 服务器(端口 35729),浏览器安装插件后,静态资源变化时自动刷新页面(不重启 JVM)。
-
生产环境禁用的原因:
- 性能开销:文件监听器持续消耗 CPU 和 IO。
- 类加载器隔离问题:双类加载器可能导致
ClassCastException(同一个类被两个 ClassLoader 加载,类型不兼容)。 - 安全风险:LiveReload 服务器暴露额外端口。
-
自动禁用机制:DevTools 检测到
java -jar启动时自动禁用(通过检查 jar 包中是否有BOOT-INF目录判断)。 -
配置排除:
spring:
  devtools:
    restart:
      exclude: static/**,public/**,templates/**
      additional-paths: src/main/java  # 额外监听路径
    livereload:
      enabled: false  # 禁用 LiveReload
3️⃣ Key Differences
| 维度 | Common Answer | Impressive Answer |
|---|---|---|
| 结构性 | 只说了"自动重启" | 双类加载器原理 + LiveReload + 禁用原因 |
| 技术深度 | 不知道双类加载器 | 清楚 Restart ClassLoader 的设计 |
| 实践经验 | 不知道 ClassCastException 风险 | 知道类加载器隔离导致的类型不兼容问题 |
| 面试官印象 | 会用 DevTools | 理解热部署的底层机制和风险 |
3、容易一起考的题
| 关联题 | 和本题的关系 |
|---|---|
| JVM 类加载器的双亲委派模型? | DevTools 热部署打破双亲委派的原理 |
| Spring Boot 懒加载如何配置? | 启动优化的另一种手段 |
| GraalVM 原生镜像 vs JVM 启动优化? | 不同场景下的启动优化选型 |
3.10 @Import 机制原理
1、基础题:@Import 注解有哪几种用法?
难度级别:⭐⭐(@Import、ImportSelector、ImportBeanDefinitionRegistrar)
1️⃣ Common Answer
@Import 可以导入一个配置类,相当于把那个类里的 Bean 都注册进来。Spring Boot 的自动装配就是用 @Import 实现的。
2️⃣ Impressive Answer
@Import 有三种用法,复杂度递增:
- 直接导入配置类:最简单,等价于在当前配置类中声明那个类。
- ImportSelector:动态决定导入哪些类,返回类名数组。
@EnableAutoConfiguration就是这种方式。
public class LLMProviderSelector implements ImportSelector {

    @Override
    public String[] selectImports(AnnotationMetadata importingClassMetadata) {
        // 根据注解元数据动态决定导入哪个实现类
        Map<String, Object> attrs = importingClassMetadata
            .getAnnotationAttributes(EnableLLM.class.getName());
        String provider = (String) attrs.get("provider");

        return switch (provider) {
            case "openai" -> new String[]{OpenAIConfig.class.getName()};
            case "claude" -> new String[]{ClaudeConfig.class.getName()};
            default -> new String[]{DefaultLLMConfig.class.getName()};
        };
    }
}

@Target(ElementType.TYPE)
@Retention(RetentionPolicy.RUNTIME)
@Import(LLMProviderSelector.class)
public @interface EnableLLM {
    String provider() default "openai";
}
- ImportBeanDefinitionRegistrar:最灵活,可以直接操作
BeanDefinitionRegistry,动态注册任意 BeanDefinition(MyBatis 的@MapperScan就是这种方式)。
public class ToolRegistrar implements ImportBeanDefinitionRegistrar {

    @Override
    public void registerBeanDefinitions(AnnotationMetadata metadata,
                                        BeanDefinitionRegistry registry) {
        // 扫描所有 @Tool 注解的类,动态注册为 Bean
        ClassPathScanningCandidateComponentProvider scanner =
            new ClassPathScanningCandidateComponentProvider(false);
        scanner.addIncludeFilter(new AnnotationTypeFilter(Tool.class));

        for (BeanDefinition bd : scanner.findCandidateComponents("com.example.tools")) {
            registry.registerBeanDefinition(bd.getBeanClassName(), bd);
        }
    }
}
3️⃣ Key Differences
| 维度 | Common Answer | Impressive Answer |
|---|---|---|
| 结构性 | 只说了"导入配置类" | 三种用法递进,覆盖静态/动态/注册三个层次 |
| 技术深度 | 不知道 ImportSelector | 清楚 @EnableAutoConfiguration 的实现原理 |
| 实践经验 | 没有自定义 Selector | 有 LLM Provider 动态选择的完整实现 |
| 面试官印象 | 知道 @Import 能导入 | 理解 Spring 扩展机制的完整层次 |
2、进阶题:DeferredImportSelector 和 ImportSelector 有什么区别?为什么自动装配要用 DeferredImportSelector?
难度级别:⭐⭐⭐(延迟导入、处理顺序、用户配置优先)
1️⃣ Common Answer
DeferredImportSelector 是延迟执行的 ImportSelector,会在所有配置类处理完之后才执行。这样可以保证用户自己的配置先生效。
2️⃣ Impressive Answer
- 执行时机对比:
| 特性 | ImportSelector | DeferredImportSelector |
|---|---|---|
| 执行时机 | 当前 @Configuration 类处理时立即执行 | 所有 @Configuration 类处理完后延迟执行 |
| 分组支持 | 不支持 | 支持 getImportGroup(),同组的 Selector 合并处理 |
| 典型用途 | @Enable* 注解的简单导入 | Spring Boot 自动装配 |
- 为什么自动装配必须用 DeferredImportSelector:
用户配置类(@ComponentScan 扫描)
    ↓ 先处理
用户的 @Bean DataSource 注册到容器
    ↓
DeferredImportSelector 延迟执行
    ↓
DataSourceAutoConfiguration 处理
    ↓
@ConditionalOnMissingBean(DataSource.class) → 检测到已有 DataSource → 跳过
如果用 ImportSelector(立即执行),自动配置类会在用户配置类之前处理,@ConditionalOnMissingBean 检测不到用户的 Bean,导致自动配置的 Bean 和用户的 Bean 冲突。
- 分组机制(Group):
DeferredImportSelector.Group允许多个 Selector 的结果合并排序,AutoConfigurationImportSelector实现了AutoConfigurationGroup,负责对所有自动配置类按@AutoConfigureOrder和@AutoConfigureBefore/After排序。
3️⃣ Key Differences
| 维度 | Common Answer | Impressive Answer |
|---|---|---|
| 结构性 | 只说了"延迟执行" | 执行时机对比 + 原因分析 + 分组机制 |
| 技术深度 | 不知道为什么要延迟 | 清楚延迟是保证用户配置优先的核心手段 |
| 实践经验 | 不知道 Group 机制 | 知道自动配置类的排序是通过 Group 实现的 |
| 面试官印象 | 知道结论 | 理解设计背后的工程权衡 |
3、容易一起考的题
| 关联题 | 和本题的关系 |
|---|---|
| Spring Boot 自动装配的完整链路? | @Import + DeferredImportSelector 是自动装配的核心 |
| @Enable* 注解的设计模式? | 模块化开关的设计范式,底层都是 @Import |
| MyBatis 的 @MapperScan 原理? | ImportBeanDefinitionRegistrar 的典型应用 |
3.11 Spring Boot SPI 机制原理
1、基础题:Spring Boot 的 SPI 机制是什么?spring.factories 是如何被加载的?
难度级别:⭐⭐⭐(SPI、SpringFactoriesLoader、类加载机制)
1️⃣ Common Answer
spring.factories 是一个配置文件,里面写了要自动加载的类名。Spring Boot 启动时会读取这个文件,然后把里面的类加载进来。这是一种 SPI 机制。
2️⃣ Impressive Answer
-
SPI 机制本质:SPI(Service Provider Interface)是一种"接口在框架侧定义,实现在使用方提供"的扩展机制。Spring Boot 的 SPI 比 Java 原生 SPI(
ServiceLoader)更强大,支持按接口类型分组加载。 -
SpringFactoriesLoader加载流程:
SpringFactoriesLoader.loadFactoryNames(EnableAutoConfiguration.class, classLoader)
  ↓
扫描所有 jar 包中的 META-INF/spring.factories
  ↓
解析 Properties 文件,按 key(接口全限定名)分组
  ↓
返回对应 key 下的所有实现类名列表
  ↓
通过反射实例化(loadInstantiatedFactories)
-
缓存机制:
SpringFactoriesLoader内部有cache(Map<ClassLoader, MultiValueMap<String, String>>),同一个 ClassLoader 只解析一次,后续从缓存读取,避免重复 IO。 -
Boot 3.x 的改进:
# Boot 2.x:spring.factories(所有 key 都在一个文件,全量加载)
org.springframework.boot.autoconfigure.EnableAutoConfiguration=\
  com.example.FooAutoConfiguration,\
  com.example.BarAutoConfiguration

# Boot 3.x:独立文件(按需加载,只加载 AutoConfiguration)
# META-INF/spring/org.springframework.boot.autoconfigure.AutoConfiguration.imports
com.example.FooAutoConfiguration
com.example.BarAutoConfiguration
Boot 3.x 的改进:不再把所有扩展点放在一个文件,避免加载不需要的扩展点,启动更快。
- spring.factories 支持的扩展点类型:
| 扩展点接口 | 作用 |
|---|---|
| EnableAutoConfiguration | 自动配置类注册 |
| ApplicationContextInitializer | 容器初始化扩展 |
| ApplicationListener | 应用事件监听 |
| SpringApplicationRunListener | 启动流程监听 |
| EnvironmentPostProcessor | 环境后处理 |
| FailureAnalyzer | 启动失败分析 |
3️⃣ Key Differences
| 维度 | Common Answer | Impressive Answer |
|---|---|---|
| 结构性 | 只说了"读取文件加载类" | 加载流程 + 缓存机制 + Boot 3.x 改进 + 扩展点类型 |
| 技术深度 | 不知道缓存机制 | 清楚 ClassLoader 级别的缓存设计 |
| 实践经验 | 不知道 Boot 3.x 的变化 | 知道独立文件的性能优化原因 |
| 面试官印象 | 知道 spring.factories | 理解 SPI 机制的完整设计 |
2、进阶题:如何利用 spring.factories 实现自己的扩展点?EnvironmentPostProcessor 的使用场景?
难度级别:⭐⭐⭐(EnvironmentPostProcessor、自定义扩展点、配置加密)
1️⃣ Common Answer
在 spring.factories 里注册自己的类,实现对应的接口就可以了。EnvironmentPostProcessor 可以在 Environment 准备好之后修改配置。
2️⃣ Impressive Answer
- EnvironmentPostProcessor 典型场景——配置解密:
public class EncryptedPropertyDecryptor implements EnvironmentPostProcessor {

    private static final String ENCRYPTED_PREFIX = "ENC(";

    @Override
    public void postProcessEnvironment(ConfigurableEnvironment environment,
                                       SpringApplication application) {
        MutablePropertySources sources = environment.getPropertySources();

        // 遍历所有 PropertySource,解密 ENC(...) 格式的配置值
        Map<String, Object> decryptedProperties = new HashMap<>();
        for (PropertySource<?> source : sources) {
            if (source instanceof MapPropertySource mapSource) {
                mapSource.getSource().forEach((key, value) -> {
                    if (value instanceof String strValue
                            && strValue.startsWith(ENCRYPTED_PREFIX)) {
                        String encrypted = strValue.substring(4, strValue.length() - 1);
                        decryptedProperties.put(key, decrypt(encrypted));
                    }
                });
            }
        }

        if (!decryptedProperties.isEmpty()) {
            // 插入到最高优先级,覆盖原始加密值
            sources.addFirst(new MapPropertySource("decrypted", decryptedProperties));
        }
    }

    private String decrypt(String encrypted) {
        // 调用 KMS 或本地密钥解密
        return AESUtil.decrypt(encrypted, getSecretKey());
    }
}
- 注册方式:
# META-INF/spring.factories(Boot 2.x)
org.springframework.boot.env.EnvironmentPostProcessor=\
  com.example.EncryptedPropertyDecryptor

# META-INF/spring/org.springframework.boot.env.EnvironmentPostProcessor.imports(Boot 3.x)
com.example.EncryptedPropertyDecryptor
-
执行时机:
EnvironmentPostProcessor在ApplicationEnvironmentPreparedEvent发布后执行,此时application.yml已加载,但 Spring 容器还未创建,不能注入 Bean。 -
Agent 场景:LLM API Key 在配置文件中加密存储(
ENC(xxx)),通过EnvironmentPostProcessor在启动时解密,避免明文存储敏感信息。
3️⃣ Key Differences
| 维度 | Common Answer | Impressive Answer |
|---|---|---|
| 结构性 | 只说了"实现接口注册" | 完整实现 + 注册方式 + 执行时机限制 |
| 技术深度 | 不知道不能注入 Bean | 清楚容器未创建时的限制 |
| 实践经验 | 没有具体场景 | 有配置解密的生产级实现 |
| 面试官印象 | 知道扩展点存在 | 有安全配置的工程实践 |
3、容易一起考的题
| 关联题 | 和本题的关系 |
|---|---|
| Java 原生 SPI(ServiceLoader)和 Spring SPI 的区别? | SPI 机制的对比,Spring SPI 更灵活 |
| Spring Boot 自动装配的完整链路? | SPI 是自动装配的基础加载机制 |
| 配置中心(Nacos)如何集成到 Spring Boot? | EnvironmentPostProcessor 的典型应用场景 |
3.12 refreshContext 核心原理
1、基础题:Spring 的 refresh() 方法做了哪些事?Bean 的生命周期是什么?
难度级别:⭐⭐⭐(refresh 流程、BeanPostProcessor、Bean 生命周期)
1️⃣ Common Answer
refresh() 是 Spring 容器的核心方法,会扫描 Bean、实例化 Bean、注入依赖。Bean 的生命周期包括实例化、属性注入、初始化、使用、销毁几个阶段。
2️⃣ Impressive Answer
refresh()12 个核心步骤:
prepareRefresh()              → 设置启动时间、激活标志、初始化属性源
obtainFreshBeanFactory()      → 创建/刷新 BeanFactory,加载 BeanDefinition
prepareBeanFactory()          → 配置 BeanFactory(ClassLoader、BeanPostProcessor、内置 Bean)
postProcessBeanFactory()      → 子类扩展点(Web 容器注册 Servlet 相关 Bean)
invokeBeanFactoryPostProcessors() → 执行 BeanFactoryPostProcessor(@Configuration 解析、@ComponentScan 扫描)
registerBeanPostProcessors()  → 注册 BeanPostProcessor(AOP、@Autowired 注入等)
initMessageSource()           → 初始化国际化
initApplicationEventMulticaster() → 初始化事件广播器
onRefresh()                   → 子类扩展(Web 容器:创建并启动内嵌 Tomcat)
registerListeners()           → 注册 ApplicationListener
finishBeanFactoryInitialization() → 实例化所有非懒加载的单例 Bean(最耗时)
finishRefresh()               → 发布 ContextRefreshedEvent,启动 Lifecycle Bean
- Bean 完整生命周期:
实例化(Constructor)
  ↓
属性注入(@Autowired、@Value)
  ↓
Aware 接口回调(BeanNameAware、ApplicationContextAware 等)
  ↓
BeanPostProcessor.postProcessBeforeInitialization()  ← AOP 代理在这里创建
  ↓
@PostConstruct / InitializingBean.afterPropertiesSet() / init-method
  ↓
BeanPostProcessor.postProcessAfterInitialization()
  ↓
Bean 就绪,放入单例缓存(singletonObjects)
  ↓
使用阶段
  ↓
@PreDestroy / DisposableBean.destroy() / destroy-method
- 最关键的两个步骤:
invokeBeanFactoryPostProcessors:ConfigurationClassPostProcessor在这里解析@Configuration、@ComponentScan、@Import、@Bean,注册所有 BeanDefinition。finishBeanFactoryInitialization:遍历所有非懒加载单例 BeanDefinition,依次实例化,这是启动最耗时的阶段。
3️⃣ Key Differences
| 维度 | Common Answer | Impressive Answer |
|---|---|---|
| 结构性 | 只说了"扫描、实例化、注入" | 12 步完整流程 + Bean 生命周期完整链路 |
| 技术深度 | 不知道 BeanFactoryPostProcessor | 清楚 ConfigurationClassPostProcessor 的核心作用 |
| 实践经验 | 不知道哪步最耗时 | 知道 finishBeanFactoryInitialization 是性能瓶颈 |
| 面试官印象 | 背过生命周期 | 理解 refresh 流程的完整机制 |
2、进阶题:BeanPostProcessor 和 BeanFactoryPostProcessor 有什么区别?各自的典型应用是什么?
难度级别:⭐⭐⭐(后处理器、AOP 代理、@Autowired 注入原理)
1️⃣ Common Answer
BeanPostProcessor 是 Bean 初始化前后的扩展点,BeanFactoryPostProcessor 是 BeanFactory 级别的扩展点。AOP 就是通过 BeanPostProcessor 实现的。
2️⃣ Impressive Answer
- 核心区别:
| 维度 | BeanFactoryPostProcessor | BeanPostProcessor |
|---|---|---|
| 作用阶段 | BeanDefinition 注册完成后,Bean 实例化之前 | Bean 实例化之后,初始化前后 |
| 操作对象 | BeanDefinition(元数据) | Bean 实例 |
| 典型实现 | ConfigurationClassPostProcessor、PropertySourcesPlaceholderConfigurer | AutowiredAnnotationBeanPostProcessor、AbstractAutoProxyCreator |
| 执行时机 | invokeBeanFactoryPostProcessors() | registerBeanPostProcessors() 注册,Bean 初始化时调用 |
- 典型应用分析:
BeanFactoryPostProcessor 典型应用:
├── ConfigurationClassPostProcessor
│   └── 解析 @Configuration、@ComponentScan、@Import、@Bean
│       注册所有 BeanDefinition(这是 Spring 最核心的后处理器)
└── PropertySourcesPlaceholderConfigurer
    └── 替换 BeanDefinition 中的 ${...} 占位符

BeanPostProcessor 典型应用:
├── AutowiredAnnotationBeanPostProcessor
│   └── 处理 @Autowired、@Value 注入(postProcessBeforeInitialization)
├── CommonAnnotationBeanPostProcessor
│   └── 处理 @PostConstruct、@PreDestroy、@Resource
└── AbstractAutoProxyCreator(AOP 核心)
    └── postProcessAfterInitialization 中判断是否需要代理
        如果需要,返回 CGLIB/JDK 动态代理对象替换原始 Bean
- AOP 代理创建时机:
AbstractAutoProxyCreator.postProcessAfterInitialization()中,检查 Bean 是否匹配任何 Advisor(切面),如果匹配则创建代理对象,替换容器中的原始 Bean。这就是为什么@Transactional方法在同一个类内部调用不生效——内部调用绕过了代理。
3️⃣ Key Differences
| 维度 | Common Answer | Impressive Answer |
|---|---|---|
| 结构性 | 只说了"Bean 级别 vs BeanFactory 级别" | 完整对比表 + 典型实现树 + AOP 代理时机 |
| 技术深度 | 不知道 ConfigurationClassPostProcessor | 清楚 Spring 最核心的后处理器是什么 |
| 实践经验 | 不知道 @Transactional 内部调用失效原因 | 能从代理创建时机解释这个经典问题 |
| 面试官印象 | 知道扩展点存在 | 理解 Spring 扩展机制的完整体系 |
3、容易一起考的题
| 关联题 | 和本题的关系 |
|---|---|
| Spring 的三级缓存解决循环依赖? | finishBeanFactoryInitialization 阶段的核心问题 |
| @Transactional 为什么同类内部调用失效? | BeanPostProcessor 创建代理的机制决定的 |
| Spring AOP 的 CGLIB 和 JDK 动态代理区别? | AbstractAutoProxyCreator 选择代理方式的逻辑 |
3.13 外部化配置加载原理(ConfigData API)
1、基础题:Spring Boot 的配置文件是如何被加载进来的?Boot 2.x 和 Boot 3.x 的加载机制有什么变化?
⭐⭐(ConfigFileApplicationListener、ConfigDataEnvironmentPostProcessor、PropertySource 加载时机)
Answer:
Spring Boot 配置加载的核心机制经历了从 Boot 2.x 到 Boot 3.x 的重大重构,主要体现在从 ConfigFileApplicationListener 到 ConfigData API 的演进。
Boot 2.x 机制:
使用 ConfigFileApplicationListener 监听器,在 ApplicationContextInitializer 阶段加载配置:
-
监听器触发:监听
ApplicationEnvironmentPreparedEvent事件 -
搜索配置文件:按优先级搜索
application.properties/yml,支持file:./config/、file:./、classpath:/config/、classpath:/四个位置 -
PropertySource 加载:将解析后的配置添加到
Environment的PropertySource链中 -
Profile 激活:根据
spring.profiles.active激活特定 profile 的配置文件
Boot 3.x 机制:
引入全新的 ConfigData API,使用 ConfigDataEnvironmentPostProcessor 替代监听器模式:
-
EnvironmentPostProcessor 触发:在 Spring Boot 启动早期执行
-
ConfigData 接口:定义统一的配置数据抽象,支持多种配置源(文件、环境变量、云配置中心等)
-
ConfigDataLocationResolver:解析配置位置,返回
ConfigDataResource -
ConfigDataLoader:加载具体的配置数据,转换为
PropertySource -
Import 链:支持配置文件的嵌套导入(
spring.config.import)
核心差异对比:
| 维度 | Boot 2.x | Boot 3.x |
|---|---|---|
| 触发方式 | 事件监听器 | EnvironmentPostProcessor |
| 配置抽象 | PropertySource | ConfigData + PropertySource |
| 扩展性 | 继承监听器 | 实现 ConfigDataLocationResolver |
| 导入支持 | 不支持配置导入 | 支持 spring.config.import |
2、进阶题:Spring Boot 的配置加载优先级完整链路是什么?命令行参数、环境变量、application.yml、application-{profile}.yml 的优先级顺序?
⭐⭐⭐(PropertySource 优先级、Profile 激活时机、配置覆盖规则)
1️⃣ Common Answer
Spring Boot 配置加载优先级从高到低依次为:命令行参数、环境变量、application-{profile}.yml、application.yml、默认配置。高优先级的配置会覆盖低优先级的同名配置。Profile 激活后,特定 profile 的配置会覆盖默认配置。
2️⃣ Impressive Answer
Spring Boot 配置加载的优先级链路是一个多层 PropertySource 栈,理解其加载顺序对多环境部署和配置调试至关重要。我从加载时机、优先级规则和实战应用三个维度展开。
一、完整的加载优先级链路(从高到低)
优先级 1:命令行参数(Command Line Args)
  格式:--server.port=8080,PropertySource 名称:commandLineArgs

优先级 2:环境变量(Environment Variables)
  格式:SERVER_PORT=8080(自动转换),支持绑定到嵌套属性

优先级 3:JVM 系统属性(System Properties)
  格式:-Dserver.port=8080

优先级 4:随机数配置(random.*)
  示例:app.id=${random.value}

优先级 5:外部配置文件(Profile 特定)
  file:./config/application-{profile}.yml
  file:./application-{profile}.yml
  classpath:/config/application-{profile}.yml
  classpath:/application-{profile}.yml

优先级 6:外部配置文件(默认)
  file:./config/application.yml → classpath:/application.yml

优先级 7:@PropertySource 注解

优先级 8:默认属性(Default Properties)
  SpringApplication.setDefaultProperties()
二、Profile 激活和配置覆盖规则
Profile 的激活方式(优先级从高到低):
-
命令行参数:
--spring.profiles.active=prod -
环境变量:
SPRING_PROFILES_ACTIVE=prod -
配置文件:
spring.profiles.active=prod
覆盖规则:Profile 特定配置覆盖默认配置的同名属性,未定义的属性继承默认值,命令行参数始终最高优先级。
三、Agent 服务场景实战
# application.yml(基础配置)
agent:
  model: "gpt-4"
  temperature: 0.7

# application-prod.yml(生产环境覆盖)
agent:
  timeout: 30000
  maxConcurrent: 10

# 启动命令(最高优先级,紧急调整)
java -jar agent-service.jar --spring.profiles.active=prod --agent.timeout=60000
调试技巧:通过 --debug 启动参数,Spring Boot 会打印完整的 ConditionEvaluationReport 和 PropertySource 栈。
3️⃣ Key Differences
| 维度 | Common Answer | Impressive Answer |
|---|---|---|
| 优先级链路深度 | 仅列出 4-5 个层级 | 完整列出 8 个层级,包括随机数、@PropertySource |
| 加载时机 | 未提及或模糊 | 明确说明在 SpringApplication.run() 极早期完成 |
| Profile 激活方式 | 仅提及配置文件 | 列出 3 种激活方式及其优先级 |
| 实战场景 | 缺少具体案例 | 结合 Agent 服务场景,给出多环境配置示例 |
| 调试技巧 | 无 | 提供 --debug 启动参数调试方法 |
3.14 Profiles 机制
1、基础题:Spring Boot 的 @Profile 和 spring.profiles.active 是如何工作的?Profile Groups 是什么?
⭐⭐(@Profile 注解、spring.profiles.active、spring.profiles.include、Profile Groups)
Answer:
- @Profile 注解的工作原理
@Profile 可以标注在 @Configuration、@Component、@Bean 方法上,只有当指定的 Profile 处于激活状态时,对应的 Bean 才会被注册到容器中。底层通过 @Conditional(ProfileCondition.class) 实现。
@Configuration
@Profile("dev")
public class DevConfig {
    @Bean
    public LlmClient devLlmClient() {
        return new OpenAiLlmClient("gpt-3.5-turbo"); // 开发环境用低成本模型
    }
}

@Configuration
@Profile("prod")
public class ProdConfig {
    @Bean
    public LlmClient prodLlmClient() {
        return new OpenAiLlmClient("gpt-4"); // 生产环境用高质量模型
    }
}
- Profile 激活方式(优先级从高到低)
# 命令行参数(最高优先级)
java -jar app.jar --spring.profiles.active=prod

# 环境变量
export SPRING_PROFILES_ACTIVE=prod

# 配置文件
spring.profiles.active: dev

# 代码编程式激活
SpringApplication app = new SpringApplication(MyApplication.class);
app.setAdditionalProfiles("dev");
- spring.profiles.include
spring.profiles.include 用于无条件激活指定的 Profile,适用于所有环境都需要的基础配置:
- Profile Groups(Boot 2.4+)
Profile Groups 允许将多个 Profile 组合成一个逻辑组,简化配置管理:
激活 prod 时,会同时激活 prod、db-prod、cache-prod 三个 Profile,避免手动激活多个 Profile。
2、进阶题:多环境配置管理的最佳实践是什么?如何在 Agent 服务中实现 dev/test/prod 三套环境的配置隔离?
⭐⭐⭐(application-{profile}.yml 加载机制、Profile 激活方式、配置中心集成)
1️⃣ Common Answer
多环境配置管理主要通过 application-{profile}.yml 文件实现。创建 application-dev.yml、application-test.yml、application-prod.yml,通过 spring.profiles.active 激活对应环境的配置文件。在 Agent 服务中,dev 环境使用低成本 LLM 模型,test 环境使用测试模型,prod 环境使用生产模型。
2️⃣ Impressive Answer
多环境配置管理的最佳实践需要从配置分层、环境隔离、配置中心集成、敏感信息保护四个维度系统设计。
第一,采用配置分层架构,避免重复配置。
基础配置放在 application.yml,所有环境共用;环境特定配置放在 application-{profile}.yml,只覆盖差异化部分。结合 Profile Groups 管理多组件配置:
# application.yml - 基础配置
spring:
  application:
    name: agent-service
  profiles:
    group:
      dev: "dev,llm-dev,vector-dev"
      prod: "prod,llm-prod,vector-prod"

agent:
  max-concurrent-tasks: 100
  timeout-seconds: 300
# application-dev.yml - 开发环境差异配置
agent:
  llm:
    model: gpt-4o-mini    # 降低成本
    api-key: ${LLM_API_KEY_DEV}
  vector:
    host: localhost
    collection: agent_dev
logging:
  level:
    com.example.agent: DEBUG
# application-prod.yml - 生产环境差异配置
agent:
  llm:
    model: qwen-max       # 高质量模型
    api-key: ${LLM_API_KEY_PROD}
  vector:
    host: milvus-prod.internal
    collection: agent_prod
第二,容器化部署使用环境变量激活 Profile。
第三,集成配置中心实现动态配置。
对于 Agent 服务这类需要频繁调整参数的场景(如 LLM 温度、最大 Token 数),集成 Nacos 配置中心,通过 @RefreshScope 实现热更新,无需重启服务:
@RestController
@RefreshScope
public class AgentController {
    @Value("${agent.llm.temperature}")
    private double temperature;
}
第四,敏感信息使用密钥管理服务。
LLM API Key、向量数据库密码等敏感信息绝不写入配置文件,通过环境变量或 Kubernetes Secret 注入:
3️⃣ Key Differences
| 维度 | Common Answer | Impressive Answer |
|---|---|---|
| 配置分层 | 简单的文件分离 | 基础配置 + 环境特定 + Profile Groups 三层架构 |
| 激活方式 | 仅提到配置文件激活 | 环境变量优先,适配容器化部署场景 |
| 动态配置 | 未提及 | 集成 Nacos,通过 @RefreshScope 实现热更新 |
| 敏感信息 | 直接写在配置文件中 | 使用密钥管理服务,通过环境变量注入 |
| Agent 场景 | 简单的环境区分 | 针对多组件(LLM、向量库)的 Profile Groups 设计 |
3.15 多模块 Starter 工程实践
1、基础题:自定义 Spring Boot Starter 的标准目录结构和命名规范是什么?spring-boot-autoconfigure 和 spring-boot-starter 模块如何分工?
⭐⭐(Starter 命名规范、autoconfigure 模块职责、AutoConfiguration.imports 注册)
Answer:
Spring Boot Starter 的标准命名规范为 xxx-spring-boot-starter(如 llm-client-spring-boot-starter),官方 Starter 则以 spring-boot-starter-xxx 命名。
标准多模块结构:
llm-client-spring-boot-starter/
├── llm-client-spring-boot-autoconfigure/   # 自动配置模块
│   ├── src/main/java/
│   │   └── com/example/llm/autoconfigure/
│   │       ├── LlmClientAutoConfiguration.java
│   │       └── LlmClientProperties.java
│   └── src/main/resources/META-INF/spring/
│       └── org.springframework.boot.autoconfigure.AutoConfiguration.imports
└── llm-client-spring-boot-starter/         # 启动器模块(仅 pom.xml)
    └── pom.xml
模块分工:
-
autoconfigure模块:包含所有自动配置逻辑(@Configuration类)、配置属性类(@ConfigurationProperties)、核心功能组件,通过AutoConfiguration.imports(Boot 2.7+)或spring.factories(旧版本)注册 -
starter模块:仅包含pom.xml,声明对autoconfigure模块和实际依赖库的依赖,提供"一个依赖引入所有功能"的体验
注册方式:
# META-INF/spring/org.springframework.boot.autoconfigure.AutoConfiguration.imports(Boot 2.7+)
com.example.llm.autoconfigure.LlmClientAutoConfiguration
2、进阶题:如何设计一个生产级的 LLM Client Starter?需要考虑哪些工程实践问题?
⭐⭐⭐(条件注解、@ConfigurationProperties、HealthIndicator、MeterRegistry、优雅降级)
1️⃣ Common Answer
设计 LLM Client Starter 主要考虑:使用 @ConditionalOnMissingBean 实现自动配置、@ConfigurationProperties 绑定 API Key 和模型名称、实现 HealthIndicator 检查连通性、用 MeterRegistry 记录请求耗时。
@Configuration
@ConditionalOnClass(LlmClient.class)
@EnableConfigurationProperties(LlmClientProperties.class)
public class LlmClientAutoConfiguration {

    @Bean
    @ConditionalOnMissingBean
    public LlmClient llmClient(LlmClientProperties properties) {
        return new OpenAiLlmClient(properties);
    }
}
2️⃣ Impressive Answer
设计生产级 LLM Client Starter 需要从稳定性、可观测性、可扩展性三个维度系统考虑,我从以下四个方面展开。
第一,智能化的条件装配与配置管理。
使用多级条件注解实现灵活装配,配置属性类加 JSR-303 校验:
@Configuration
@ConditionalOnClass({LlmClient.class, OpenAiApi.class})
@EnableConfigurationProperties(LlmClientProperties.class)
@AutoConfigureBefore(WebMvcAutoConfiguration.class)
public class LlmClientAutoConfiguration {

    @Bean
    @ConditionalOnMissingBean
    @ConditionalOnProperty(prefix = "llm.client", name = "enabled", havingValue = "true", matchIfMissing = true)
    public LlmClient llmClient(LlmClientProperties properties,
                               ObjectProvider<List<LlmClientInterceptor>> interceptorsProvider) {
        OpenAiLlmClient client = new OpenAiLlmClient(properties);
        client.setInterceptors(interceptorsProvider.getIfAvailable());
        return client;
    }
}
@ConfigurationProperties(prefix = "llm.client")
@Validated
public class LlmClientProperties {

    @NotBlank
    private String apiKey;

    @NotBlank
    private String model = "gpt-3.5-turbo";

    @Min(1000) @Max(120000)
    private Duration timeout = Duration.ofSeconds(30);

    @Min(1) @Max(10)
    private Integer maxRetries = 3;
}
第二,可观测性建设(健康检查 + 指标)。
实现深度健康检查,不仅检测连通性,还检测配额和限流状态:
public class LlmClientHealthIndicator implements HealthIndicator {

    @Override
    public Health health() {
        try {
            LlmModelsResponse response = client.listModels();
            return Health.up()
                .withDetail("model", properties.getModel())
                .withDetail("quota", response.getQuota())
                .build();
        } catch (RateLimitException e) {
            return Health.down()
                .withDetail("error", "Rate limit exceeded")
                .withDetail("retryAfter", e.getRetryAfter())
                .build();
        }
    }
}
指标暴露涵盖请求耗时、Token 消耗、成功率:
Timer.builder("llm.client.request.duration")
    .tag("model", client.getModel())
    .register(registry);

Counter.builder("llm.client.tokens.used")
    .tag("type", "prompt")
    .register(registry);
第三,优雅降级与容错机制。
使用 Resilience4j 实现熔断、重试,当熔断器打开时返回缓存结果:
@Bean
public LlmClient resilientLlmClient(LlmClient delegate, LlmClientProperties properties) {
    CircuitBreakerConfig config = CircuitBreakerConfig.custom()
        .failureRateThreshold(50)
        .waitDurationInOpenState(Duration.ofSeconds(30))
        .build();

    RetryConfig retryConfig = RetryConfig.custom()
        .maxAttempts(properties.getMaxRetries())
        .retryOnException(e -> e instanceof TimeoutException || e instanceof RateLimitException)
        .build();

    return new ResilientLlmClient(delegate,
        CircuitBreaker.of("llmClient", config),
        Retry.of("llmClient", retryConfig));
}
第四,扩展性设计(拦截器机制)。
提供拦截器 SPI,支持自定义请求/响应处理(日志、签名、脱敏等):
public interface LlmClientInterceptor {
    default LlmRequest beforeRequest(LlmRequest request) { return request; }
    default LlmResponse afterResponse(LlmRequest request, LlmResponse response) { return response; }
    default void onError(LlmRequest request, Exception e) {}
}
总结: 生产级 Starter 设计的核心是开箱即用与生产就绪的平衡。通过条件装配实现按需加载,通过健康检查和指标实现可观测性,通过熔断降级保障稳定性,通过拦截器机制提供扩展性。
3️⃣ Key Differences
| 维度 | Common Answer | Impressive Answer |
|---|---|---|
| 条件装配 | 仅用 @ConditionalOnMissingBean | 多级条件注解,避免不必要的 Bean 创建 |
| 配置管理 | 简单的属性绑定 | JSR-303 校验 + spring-configuration-metadata.json IDE 提示 |
| 健康检查 | 仅检测连通性 | 深度检查:连通性 + 配额 + 限流状态 |
| 指标暴露 | 仅记录请求耗时 | 多维度:耗时、Token 消耗、成功率,支持 Prometheus 集成 |
| 容错机制 | 简单异常处理 | Resilience4j 熔断、降级、重试,提供缓存降级策略 |
| 扩展性 | 无扩展机制 | 拦截器 SPI,支持日志、签名、脱敏等自定义处理 |